Tag: #TFTQ

  • The Sapphire and Marina: Three Months in a Leaky Boat

       At midday on 8 September 1859, the 749-ton merchant shipSapphire weighed anchor and began slowly making her way out of Port Curtis (present-day Gladstone, Queensland). She was ultimately bound for India via Torres Strait, with a consignment of 60 Australian horses purchased by the British Indian Army. But before the ship could clear the natural harbour, she ran aground on a sandbar and had to wait for the rising tide to lift her off.  So began a voyage that would cost 18 men their lives and last five gruelling months, only for the few survivors to wind up back where they had started. Their story is a remarkable one of perseverance in the face of unimaginable hardship, served with a healthy measure of good luck.   

    The Sapphire bore out into the Coral Sea and then headed north outside the Great Barrier Reef. On 23 September, Captain Bowden calculated he was somewhere off Raine Island. That afternoon, the lookout sighted a line of breaking surf heralding the outer edge of the reef. Bowden had the ship put about, and they tacked back and forth through the late afternoon. Captain Bowden intended to hold his position in deep water overnight and make his way through the reef first thing in the morning.

    Illustration of Booby Island, Torres Strait – Otherwise, Post Office. From the Illustrated Sydney News, Fri 16 Dec 1864, Page 9.

        But shortly after sunset, the alarm was raised. A lookout sighted a long, uninterrupted curve of white water directly in their path. By the time the ship responded to the call to pull hard about, the breakers were just 500 metres off the leeward bow. There was now insufficient sea room to turn the ship around and point her back out to sea.  The Sapphire struck the coral reef broadside. Huge waves swept her deck. The force of the collision brought down the fore-top-gallant mast, and one of their lifeboats was swept from its davits. The ship heeled over, and all seemed lost. Captain Bowden ordered the main mast cut away, hoping the vessel might right itself. When the mast came down, it landed on the deck, smashing the longboat to pieces. It also brought down the mizzen mast, which in turn crashed onto the lifeboat, damaging it. Within minutes, three of the Sapphire’s five boats were lost. Everyone spent a harrowing night sheltering as best they could while the terrified horses remained trapped in the hold.

       Breaking with maritime convention, by leaving his ship, Captain Bowden set off in the morning to search for somewhere to land. First Mate William Beveridge was left in charge of the stranded vessel. Beveridge began preparations to abandon the ship and also had the carpenters try to repair the two badly damaged boats, only half expecting that Bowden might return. It seems that Beveridge and Bowden did not see eye to eye, and the first mate may even have blamed his captain for running aground. However, Bowden did return to the Sapphire, having found a suitable refuge on Sir Charles Hardy Island about 85 km away.

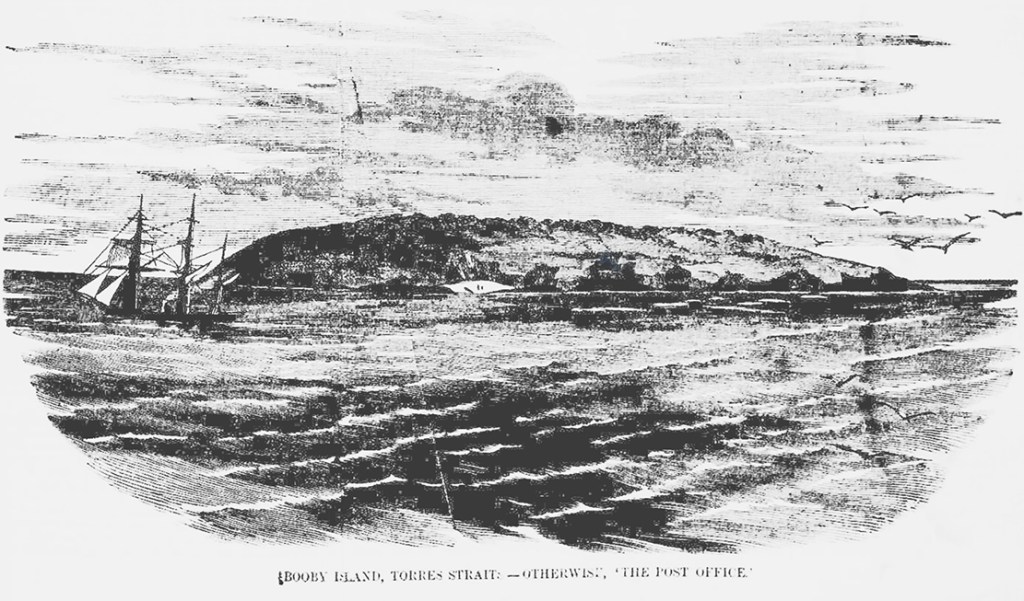
       The Sapphire’s crew of 28 men took to the two surviving boats and headed to the island, abandoning the ship and the 60 horses still trapped below. Captain Bowden decided they should return to Port Curtis, 1,500 kilometres to the south, and they left messages in a bottle hung from a tree telling of their intentions. They set off south on October 6 but immediately encountered strong headwinds. Bowden soon gave up on heading south, turning his boat around to head north, through Torres Strait, intending to make for Booby Island. In another unusual turn of events, Beveridge did not follow suit. He continued trying to push south for another day or two before he also gave up and turned around.

    Sapphire survivors route through Torres Strait from leaving the Sapphire and finding the Marina.

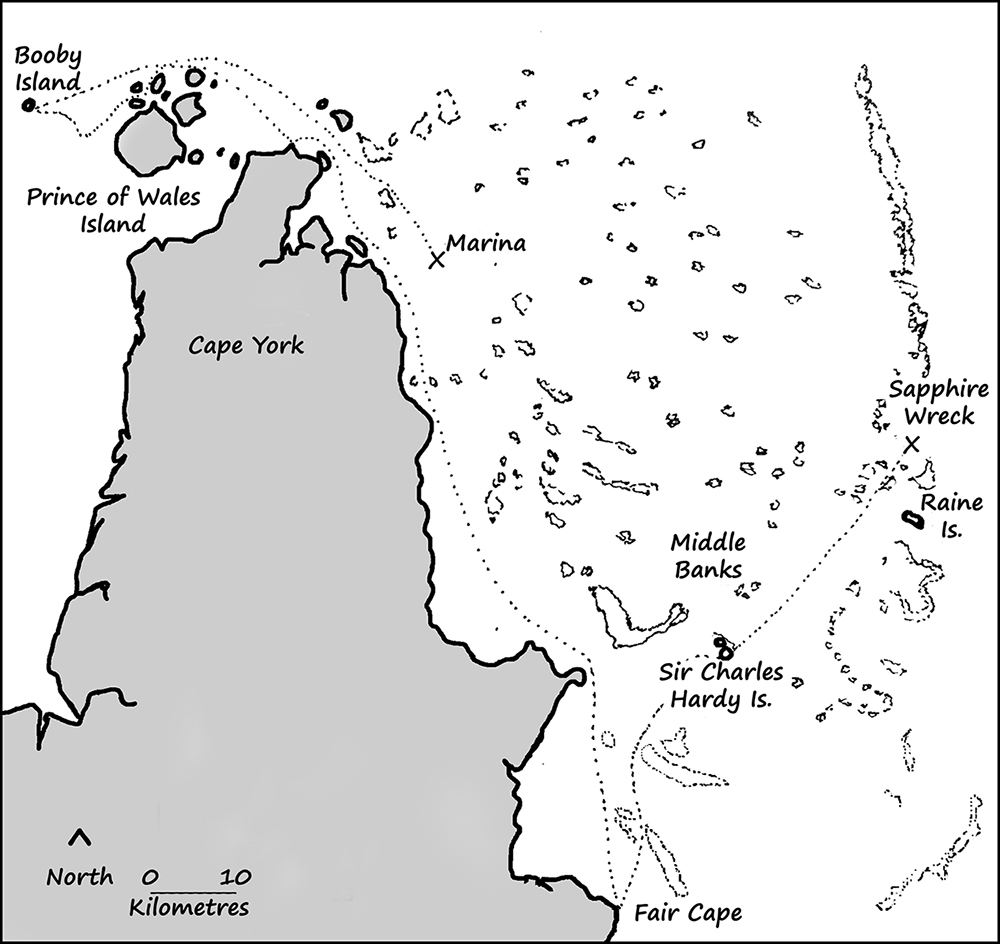
       Beveridge reached Booby Island in mid-October to find Bowden and the rest of the men already there. By now, they had been roaming the seas around Torres Strait for almost a month. The provisions they found there were a godsend for the hungry sailors, but they would not last indefinitely. Bowden and Beveridge agreed that they would have to leave there sooner or later. It was approaching cyclone season, and they had not seen another vessel since becoming marooned. They would likely not see another ship pass by Booby Island until April or even May the next year.

       Bowden and Beveridge put their differences aside and decided to make another attempt to return to Port Curtis, despite their recent failure. But as soon as they got clear of the island, they were struck by the same contrary winds that had plagued them earlier.

       While Beveridge and his boat were off Friday Island, they were set upon by Torres Strait Islanders and one of the men was speared to death. Meanwhile, Captain Bowden’s boat was off Hammond Island. They had stopped to trade with a party of Islanders, but in what seemed like an unprovoked attack, a volley of spears and arrows was launched into their overcrowded boat. Only one man was able to jump clear and swim away. He would later be rescued by Beveridge, who had gone in search of Bowden’s boat.

       Beveridge and his men continued pushing back east and eventually made it around the tip of Cape York. They then picked their way through the maze of coral reefs, and their luck finally changed for the better.

       They spotted a ship in the distance, the first they had seen since abandoning their own vessel some six weeks earlier. But, as they drew closer, they found it was deserted. The ship proved to be the barque Marina, which had run aground around the same time the Sapphire had been wrecked. It too had been abandoned by its crew, and they had also made it to Sir Charles Hardy, reaching it only hours after the Sapphire castaways had left. Miraculously, the Marina had floated off the reef on a spring tide only to drift around Torres Strait for the next several weeks.

    Marina’s course down the Queensland Coast. Source Google Maps.

       The Marina’s crew had then set off south for Port Curtis, and after 43 days of arduous sailing, they made it safely to port and notified the authorities of the loss of their own ship and also of the Sapphire. HMS Cordelia was dispatched north to search for the Sapphire’s missing men. However, she only steamed as far as Cape Upstart, thinking the lost sailors could not still be any further north. But they were wrong. By now, it was late January 1860, and the Sapphire’s crew was anchored off Lizard Island in the Marina, 500 km further north.

       Back in late November, Beveridge had decided they should sail the Marina to Port Curtis rather than try to do so in their small pinnace. Setting off on the 26th, they battled the same contrary winds and currents that had previously frustrated them. For the next two months, they made painfully slow progress. They anchored for days and weeks at a time, waiting for the south-easterlies to fall off. In the first month, they travelled just 180 km.

       They spent tiring Christmas Day kedging the stranded barque off a sandbar, and they would run aground twice more in the weeks that followed. The Marina’s hull was so damaged that water flowed freely in and out of the hold. The only thing keeping the ship afloat was her cargo of tightly packed Kauri logs.

       On 9 February, they were anchored off Palm Island.   In the past two and a half months, they had covered a little more than half the distance to Port Curtis. They still had another 800 km or more to go.   All seemed lost.   Their food had all but run out, and they were slowly starving to death.    

    Finally, their luck turned around. The wind started blowing from the north. They put to sea and made steady progress south. Three days later, Beveridge sighted Cape Upstart off the port bow. The next day, they were cruising through the Whitsundays. They were now only 400 km from Port Curtis. A couple of days after that, they crossed Keppel Bay, and the next day, 17 February, they anchored off Facing Island just outside Port Curtis. No one had the strength to manoeuvre the crippled vessel into port. They took to the Sapphire’s pinnace again and surprised everyone with their return, for they had long been given up for dead.

    The Sapphire’s full story is told in A Treacherous Coast: Ten Tales of Shipwreck and Survival from Queensland Waters, available as an eBook or paperback through Amazon.

    © Copyright C.J. Ison, Tales from the Quarterdeck, 2021.

    Enter your email address in the form below to be notified of new posts.

  • The Loss of the Mandalay: Between a Rock and a Hard Place

    Postcard of the Mandalay of Farsund Norway which was shipwrecked at Mandalay Beach near Walpole Western Australia in 1911.

        As Captain Emile Tonnessen saw the sheer granite walls of Chatham Island loom into sight, he knew his ship and crew of 12 men were in serious trouble. He had been pushed dangerously close to Western Australia’s southern coast by unrelenting gale-force wind and high seas for the past several days. And now his 913-ton iron barque Mandalay was in imminent danger. His chart showed that, should he escape crashing into Chatham Island, there was still an uninterrupted line of cliffs beyond which he knew he could not avoid

       The Mandalay had sailed from Delagoa Bay (now Maputo), Mozambique, in early April 1911, bound for Albany WA to take on a cargo of Karri logs destined for Buenos Aires, Argentina. It was to be the 68-year-old captain’s final voyage before retiring to spend time with his children and grandchildren, whom he had seen little of during his more than half a century at sea. But for a last-minute change of plan, he would have returned to his home in Norway directly from Southern Africa.

       The voyage was largely uneventful until Saturday, 13 May, when they neared the Western Australia coast in the vicinity of Cape Leeuwin. The weather had rapidly deteriorated. South-westerly winds grew to hurricane strength, and mountainous seas washed over the vessel. All canvas was taken in, and the Mandalay was swept along under bare poles. The ferocious weather continued for two days, pushing the helpless vessel towards the rugged and sparsely populated coast.

       The crew tried everything they could to get control of the ship. But the only sail they could put up was on the fore-top mast. It was insufficient to deviate the ship from the course the storm was relentlessly pushing them. They had no chance of putting out into open water.

    Chatham Island viewed from Mandalay beach. Photo C.J. Ison.

       On Monday morning, 15 May, they cleared the kilometre-wide and 90-metre-high granite outcrop that is Chatham Island with only a few hundred metres to spare. Tonnessen later recalled that the waves were so large and powerful they crashed completely over the island as his ship raced past.

       While they had escaped being smashed against the granite slopes of the island, it was clear they would not be so lucky to get past the sheer cliffs of Long Point now lying somewhere ahead through the torrential rain. The captain took the only action he could.

       He would have to sacrifice his ship to give his crew a fighting chance of survival. In all his years seafaring, he had never been shipwrecked, but now he was going to deliberately run his vessel aground. It was no doubt made doubly hard for him, as he was a part-owner of the Mandalay, and he knew her to be underinsured.

    The Mandalay stranded on the beach.

       It was now about one o’clock in the afternoon. Tonnessen lined up to run the ship ashore on the only beach he could see, hoping for the best. The crew hoisted as much sail as they could, then donned their cork lifebelts and braced for the impact. About 100 metres from the beach, the bow struck the sand hard. The top main mast came crashing down, and the ship bounced along the seabed as successive waves lifted the ship and pushed it a little closer to shore. Then the Mandalay swung broadside to the ocean swells, and breakers crashed over the deck, sweeping it clean of anything not securely tied down.

       The crew lowered a lifeboat over the lee side, but the seas were too turbulent to safely cross the short distance to land. One of the young seamen, Knut Knutsen, tied a rope to his lifebelt and dived into the sea, intent on getting a line ashore.

       Unfortunately, the rope became entangled around his legs, and he floundered in the chaotic surf. Knutsen was close to drowning when a second sailor, Frank Ward, dived into the maelstrom to rescue him. Ward managed to get his friend to shore, and the two of them anchored their end of the rope. With one end of a line attached to the ship and the other end with Ward and Knutsen on shore, the lifeboat was able to ferry the rest of the men to safety.

    L-R Frank Ward and Knut Knutsen at Fremantle after the wreck of the Norwegian barque Mandalay. Photo published in the Western Mail, 3 June 1911, p. 27.

       The castaways were able to get sufficient materials ashore to build a shelter using some of the ship’s sails and spars. Unfortunately, they soon discovered that most of the food they salvaged had been contaminated with seawater.  They ate it regardless, figuring it was better than starving.

       They spent several miserable days camped on the beach, hoping they might be rescued. They placed a pole high on a sand dune with a distress signal flying. Several ships were seen passing in the distance, but none deviated from their course. Thonnessen knew it would have been suicide to try to get a boat ashore in the appalling conditions. But he hoped that at least one of the ships had seen the wreck and the fluttering flags and reported the disaster to the port authorities in Albany.

    The crew of the barque Mandalay. Photo courtesy Walpole Nornalup and District Historical Society.

       While Captain Tonnessen and the others remained camped on the beach, the first mate, Lars Gjoem, and two seamen set off on Tuesday, the day after the wreck, with compass and chart to see if they could find their way cross-country to the nearest settlement. Two days later, they returned to the beach cold, wet and exhausted, unable to find a path through the dense bush.

       On Friday, 19 May, the day after the party returned, the second mate, Frederick Fincki, climbed the highest hill behind the beach, and from that vantage point, he thought he could see a route through the maze of broken ground. He briefly returned to the camp to collect a staff and a knife and set off towards what he would later learn was Nornalup Inlet.

       He soon found himself wading through a swamp. But he doggedly pushed on for several hours, praying he would eventually reach dry land. Fincki made it to Nornalup inlet, arriving just as a local settler, Frank Thompson, was returning in his boat with supplies from Albany. Fincki was lucky, for that was a trip Thompson only did once every three months.

       Thompson, picked up Fincki and took him to his home, wondering to himself what would have happened had he not been passing when he did. It was bitterly cold, night was fast approaching, and the young Norwegian had been far from dry land. Thompson thought his chances of surviving would have been poor.

       The following day, Thompson, his son and the second mate returned to the beach to rescue the remaining men. Over the next several days, the shipwrecked sailors were cared for by Thompson and other settlers until they could be delivered to the small settlement of Denmark, located further down the coast. From there they were taken on to Albany, where they caught the train to Perth.

    Mandalay Beach with Long Point in the background. The wreck lies approximately in the centre of the photo. Photo C.J. Ison.

       Frank Thompson was presented with a gold fob watch by a grateful Norwegian Consul. Thompson and the other settlers who came to the crew’s aid earned the undying gratitude of Captain Tonnessen and his men. The Mandalay was never refloated and slowly rusted away on the beach that now bears her name. Its remains are periodically exposed when the conditions are right.

    ©Copyright C.J. Ison / Tales from the Quarterdeck, 2020.

    To receive notification of future blog posts, enter your email address below.

  • HMS Boomerang 1891-1904

    HMS Boomerang 1891-1904

    HMS Boomerang anchored in the Fitzroy River at Rockhampton. Photo courtesy the State Library of Queensland.

    HMS Boomerang was a Sharpshooter-class torpedo gunboat which served at the Australia Station between 5 September 1891 and 22 August 1904.

    She was originally named HMS Whiting when construction began but renamed Boomerang shortly before sailing for Australia.   The Boomerang was 74 metres long, 8.2 metres beam, 2.59 metres draft and displaced 735 tons.  

    Crew on the deck of the HMS Boomerang firing a torpedo. Photo Courtesy State Library of Queensland.

    She was armed with five torpedo tubes and carried 15 torpedos, two quick firing 4.7 inch guns and four three-pounders. The Boomerang had a tops speed of 35 km/h (19 knots) and had a crew of 91.

    The Boomerang was part of the Royal Navy’s Australian Auxiliary Squadron which comprised 5 cruisers and two torpedo gunboats.   While there was no immediate or specified threat to Australia there was an underlying fear in this country of invasion from Russia dating back to the Crimean War.

    Sailors during training exercise on HMS Boomerang in 1892. Photo Courtesy State Library of Queensland.

    The Boomerang returned to England in August 1904 and was sold off in Plymouth the following year.

    © Copyright C.J. Ison, Tales from the Quarterdeck, 2022.

    To receive notification of future blog posts enter your email address below.