Tag: Shipwreck

  • The Tragic Loss of George III – 1835

    The Wreck of George III, by Knud Bull, wikimedia commons.

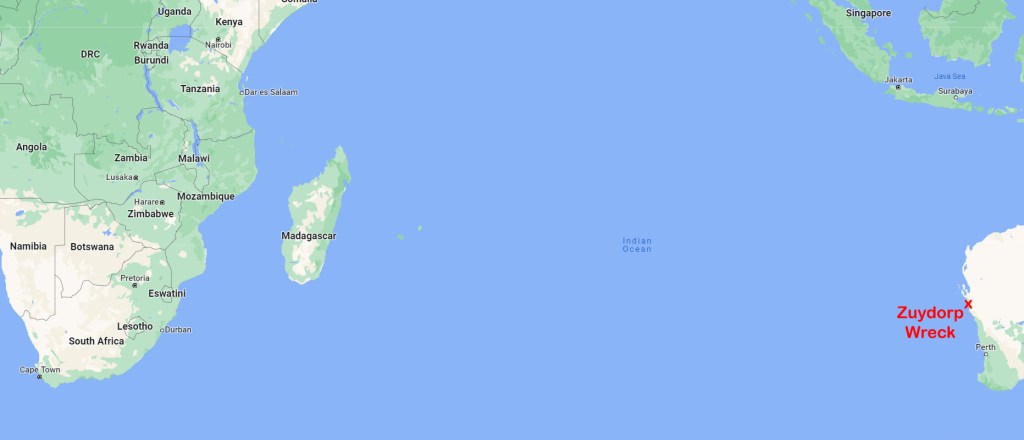
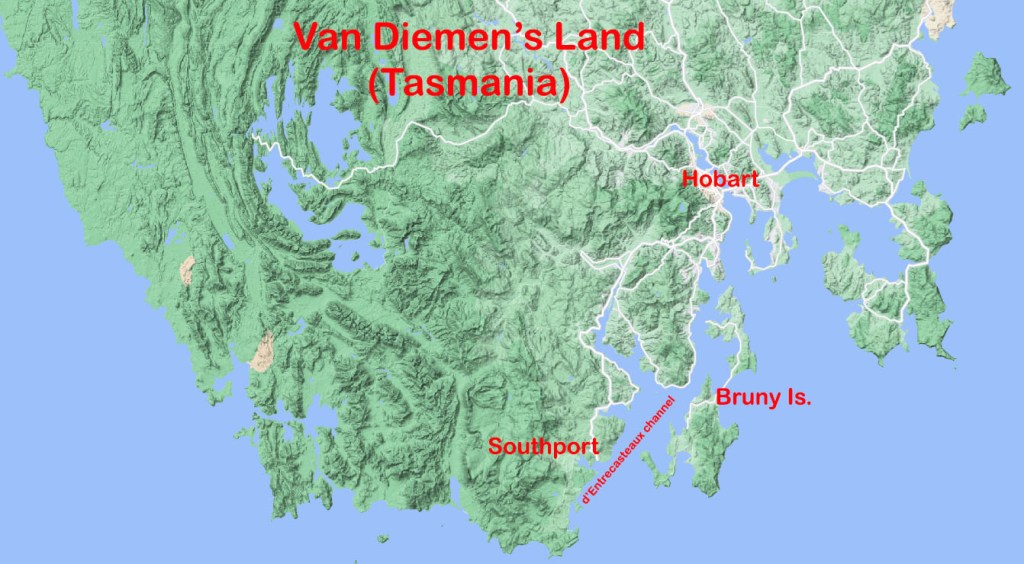
       The 400-ton ship George III sailed from England on 12 December 1834, bound for Van Diemen’s Land (Tasmania). She was carrying nearly 300 people, of whom 220 were convicts. When they were less than 80 km from Hobart, tragedy struck with a terrible loss of life.

       Around 11 a.m. on Sunday, 12 April 1835, the George III made land at South Cape, the southernmost point of Tasmania. By early evening, they had entered the D’entrecasteaux Channel to make the final run up the coast to the mouth of the Derwent River. From there, it would have been a short cruise up the river to Hobart Town. She put the dangerous Actaeon Islands behind her around 8.30 that night. The moon was out, the weather mild, and they were being pushed along at a modest 1 ½ to 2 knots (3 – 4 km/h) by a light breeze blowing off the land.   

    Captain William Moxey had a man in the chains sounding the passage as they made their way north. Repeated soundings showed they were in 20 fathoms (36m) of water, which was more than deep enough for safe passage. Then, shortly before nine o’clock, Moxey was stunned to hear the man call out “quarter less four,” meaning they were in less than four fathoms (7m) of water. He ordered the helm put hard to port. But before the ship could respond, she struck ground and came to a stop where the chart said there was clear passage.

    Southern Tasmania. Google Maps.

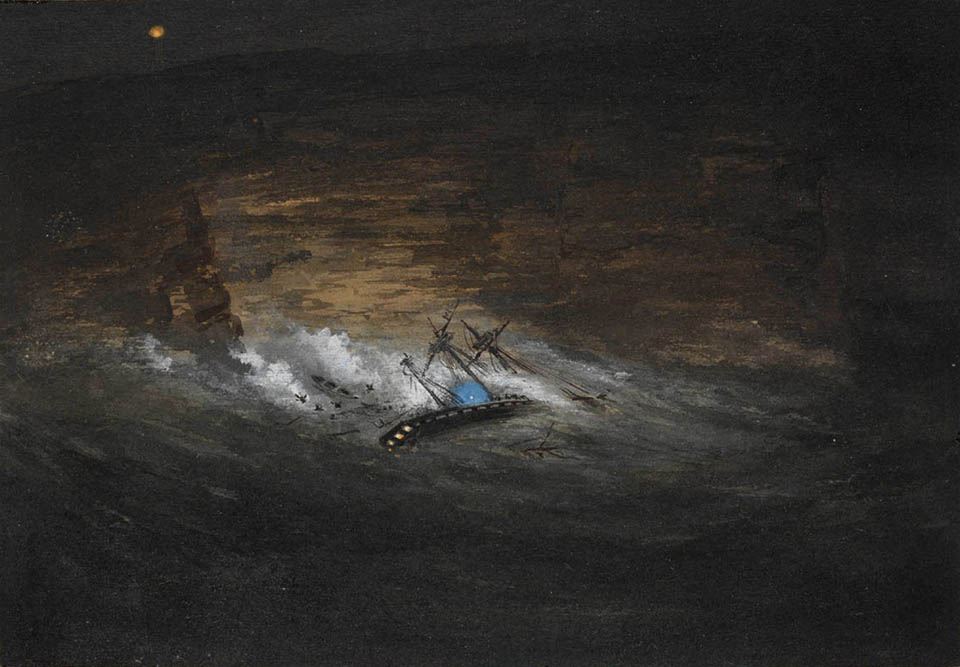
       The captain had soundings taken around the ship and found they were stranded on an uncharted rock with between three and five metres of water surrounding them. The initial collision was not particularly violent, but now that the ship was stuck fast, the ocean swells began lifting her up and dropping her back down on her rocky perch. Within minutes, the repeated pounding brought the main mast crashing down. The mizzen mast came down with it, littering the deck with a tangle of rope, canvas and timber spars.

       The crash brought everyone on deck, except for the prisoners. Seamen not on watch, passengers and the complement of soldiers hastily dressed and came up to see what had happened. Captain Moxey gave the order to abandon ship and oversaw the evacuation in the ship’s boats. However, efforts were severely hampered by the continued pounding and the mess of debris strewn across the deck and floating in the water.

       Moxley ordered one of his boats with a crew of seven to make for Hobart as quickly as possible to get help. Then he got the evacuation of the passengers and the rest of the crew underway. Meanwhile, the convicts were still locked below deck with armed guards stationed over the hatchway.

       The situation was becoming dire for the convicts trapped in their prison. They were already standing waist-deep in freezing water, and despite their pleas to the guards to be let out, the hatch covers remained locked. In genuine fear for their lives, several rushed forward and tried to force the hatch cover open with their bare hands. According to one of the surviving convicts, the guards opened fire to force them back, and at least one prisoner was struck by a bullet and killed. In a later inquiry, Moxey would dispute the claim, saying that the guards had only been stationed over the hatchways to keep the panicking prisoners contained below deck until the women and children had safely been evacuated. In fact, the inquiry reads like the minutes of a mutual appreciation society meeting, each officer praising the efforts of the others in saving so many lives.

    The Colonist, 7 May 1835, p. 5.

       Fifteen minutes after striking the rock, the deck was awash with water, and the last of the boats carrying 40 people had left the stranded vessel. Captain Moxley was among them, having been pulled from the water after he became trapped between floating timbers.

       By this time, the guards watching over the hatchways had left in the last boat. The trapped convicts were now able to force their way on deck to find it deserted.  But some 50 or so prisoners had been too ill to save themselves. Most had been suffering from scurvy and had drowned where they lay unable to escape the rising water.

       After putting the survivors ashore, Moxley returned to the ship and began taking off the convicts. By the time he had reached the George III for the third time, a schooner sent from Hobart had arrived and was taking off the last of the survivors.

       One hundred and thirty-four people lost their lives. Three of them were passengers – a woman and two children – and two were members of the ship’s crew. Convicts made up the remaining 128 fatalities. Most never had a chance, trapped in the hold as the water rose around them.

    The next morning, a convict named John Roberts was found dead, lashed to a ringbolt in the surgeon’s cabin. It seems he could not swim, so he had tied himself off, hoping to be washed ashore as the ship broke up.    Despite the heavy loss of life, 160 people were saved. They were all taken to Hobart, cold, wet, and thoroughly exhausted from the ordeal.

    View of Hobart Town by Samuel Davenport, circa 1835.

         The inquiry into the loss of the ship found no one was to blame. It concluded that the George III had struck a rock not recorded on the chart. Then it came time for the inquiry to consider the treatment of the convicts. No officer admitted to ordering the prisoners to be confined below deck as the hold flooded with water. The Corporal of the guard testified that the muskets were only used to “intimidate” the prisoners, and only one shot was fired, and that into the air. No one was held accountable for the loss of so many prisoners.

     © Copyright C.J. Ison / Tales from the Quarterdeck, 2022.

    To be notified of future blogs, please enter your email address below.

  • S.S. Maheno (1905 – 1935)

    The SS Maheno wrecked on K’Gari in 1935. Photo C.J. Ison..

       As anyone who has ventured across to K’Gari (Fraser Island) knows, the rusting wreck of the old luxury passenger liner SS Maheno makes an imposing presence on the long sandy beach, which serves as the island’s main highway. She had been swept ashore during a cyclone 90 years ago while on her way to be broken up in a Japanese scrapyard. It was an inglorious end for a steamer that was once one of the fastest luxury liners on the trans-Tasman run.

       The SS Maheno was built at William Denny and Brothers shipyards on the Clyde River in 1905 for the New Zealand-owned Union Steam Ship Company. She measured 122m in length and had a gross tonnage of 5,300 tons. The vessel was equipped with powerful steam turbine engines, which were revolutionary for the time. They could push her along at an impressive top speed of nearly 20 knots (36km/h).

    S.S. Maheno postcard. Courtesy State Library of Queensland.

       For much of her career, she carried cargo and passengers between Sydney, Melbourne, and Hobart in Australia, and Wellington, Auckland, and Dunedin in New Zealand. On one occasion, the Maheno made the dash from Sydney to Wellington in just under three days, a record that would remain unbeaten for 25 years. She also occasionally was called upon to carry passengers across the Pacific to San Francisco.

       The Maheno was not only fast, but she was also luxurious. She could accommodate 120 passengers in her sumptuous first-class cabins, 120 in second-class and 60 more passengers in third-class. The saloons, dining rooms and other public areas were beautifully appointed, harking back to a bygone era. She was a magnificent example of early 20th-century shipbuilding at its finest.

    SS Maheno, Saloon was luxuriously fitted out. Phot Courtesy State Library of Queensland.

       During the First World War, she served as a hospital ship for Australian and New Zealand forces. She ferried casualties from Anzac Cove to Malta for medical treatment during the Gallipoli Campaign. After the failure of Gallipoli she transported wounded New Zealanders back home before returning to Europe where the war raged on. Between 1915 and 1918, she made several trips back to New Zealand, returning wounded Kiwi soldiers home to their loved ones. She also carried thousands more sick and wounded men from the Western Front across the English Channel so they could receive attention in England.

       After the war, she returned to her regular duties crossing the waters between New Zealand and Australia. As she aged, newer ships took over her routes. However, she remained on the Melbourne – New Zealand run until the beginning of 1935 when she was finally retired. Throughout her 30 years of service, she was never involved in a serious accident, a testament to the ship and the captains who commanded her. But on her final voyage, that was about to change.   

    In July 1935, the Maheno left Sydney under tow by the steamer Oonah, another aging vessel destined for demolition in Japan. “Like a minnow towing a whale, the little Oonah set out to tow the Maheno, which towered above her like a giant,” is how the Daily Telegraph described the scene as the two tethered ships made their way down Sydney Harbour to begin their long voyage north.

    SS Maheno shortly after she ran aground. Photo Courtesy State Library of Queensland.

       The first few days were relatively uneventful as the Oonah towed the Maheno up the New South Wales coast.  But by the time they reached Queensland waters, the weather had turned nasty. The two ships were caught in a raging storm. Huge swells swept around them, howling gale-force winds ripped at the rigging, and the decks and superstructures were lashed by heavy rain. Despite the thick weather, the ships might have survived, but that was not to be.

       The Oonah reported via wireless that she was having problems with her steering. However, the message was garbled, and the call for help went unanswered. Then the captain of the Oonah sent another message reporting that the tow cable had parted and the Maheno was adrift. He also radioed that the two vessels were about 80 km off K’Gari when the Maheno was lost from sight.

       Efforts to save the two stricken ships swung into gear. The insurance underwriters dispatched a large salvage tug from Brisbane to assist the vessel, and the Oonah would be rescued without further incident. The Maheno, on the other hand, was now at the mercy of the storm without any means of propulsion. There were grave fears for the eight Japanese sailors on board. But they rode out the maelstrom, and eventually, the Maheno gently made landfall.

    The SS Maheno ship wreck on K’Gari. Photo: C.J. Ison.

       A search aircraft sent out from Maryborough spotted the former luxury liner driven broadside onto Fraser Island’s (K’Gari’s) long sandy beach about 30 km south of Indian Head. Her location was then relayed to the Oonah and the salvage tug heading up from Brisbane.

       The Japanese crew got ashore safely and were soon greeted by carloads of tourists, who had driven down from the nearby holiday village of Happy Valley to take a closer look at the beached ship.

       At first, there were some thoughts of refloating the Maheno, but they were swiftly abandoned, for she was firmly stuck in the sand. She remains there to this day, perhaps the most prominent and accessible shipwreck on the Australian coast.

    © Copyright C.J. Ison / Tales from the Quarterdeck, 2022.

    To be notified of future blogs, please enter your email address below.

  • The Dunbar Tragedy – 1857

    The Dunbar shipwreck, by Samuel Thomas Gill, courtesy the State Library of New South Wales.

    The loss of the Dunbar in August 1857 was one of the more tragic and distressing shipwrecks to occur in Australian waters.   On the morning of Friday 21 August people living in Sydney’s East awoke to find wreckage and mutilated bodies dotted along the rugged coast and inside the harbour mouth.   A large ship had come to grief, but its identity would remain a mystery for much of that day.

    The weather on the night of 20 August was thick with heavy rain, strong winds and a powerful swell creating mountainous waves.    The Dunbar had sailed from London 81 days earlier and was making its way up the New South Wales coast nearing the end of its voyage.  

    She passed Botany Bay around 8.30 in the evening.  Then Captain James Green headed out to sea on a starboard tack under closely reefed sails.    They then changed course again heading towards the entrance to Sydney Harbour.   The captain sent the Second Mate to the forecastle and asked him to keep a good lookout for the North Head.  

    By Day and Son; Thomas Goldsworth Dutton; William Foster – http://collections.rmg.co.uk/collections/objects/140576, Public Domain, https://commons.wikimedia.org/w/index.php?curid=63202217

    Suddenly the Mate called out “breakers ahead,” as churning white water at the base of the cliffs materialised out of the inky gloom.   It was now a little after midnight.  Captain Green ordered the ship round but the surging seas drove her broadside onto the rocks before she could respond.  

    Passengers were jolted awake by the violent impact and streamed on deck in panic, most still dressed in their night attire.    But before any thought could be given to getting them into the lifeboats another wave smashed the Dunbar into the cliffs and she immediately started breaking up. 

    Passengers and crew alike were swept into the surging sea and dashed against the rocks.  Others were crushed between heavy timbers and splintering wood.  

    There were 122 people on the Dunbar as she neared Sydney Harbour.   She had a crew of 59 and was carrying 63 passengers.   Most of the passengers, including families with young children, were residents of Sydney returning home after spending time in England.  

    Incredibly, one of the crew managed to survive.    As the ship broke apart John Johnson grabbed hold of a plank with three other men to keep themselves afloat as they were tossed around in the turbulent white water.   Two of their number soon lost their hold but Johnson and the ship’s Boatswain were dumped high on the rocks by a large wave.    Johnson scrambled higher but before the other man could do likewise, he was caught by another wave and sucked back out to sea.    Johnson continued climbing until he reached a narrow ledge and could go no further.   

    The Sailor Rescued. Courtesy the National Library of Australia 211620415-22

    The next day he heard people on the clifftop above him and saw several ships pass by but failed to attract anyone’s attention.   He remained a second night on the ledge before a young lad spotted him from near Jacob’s Ladder.  The boy, Antonio Wollier, volunteered to be lowered down to the ledge by a rope to rescue the survivor.  

    Meanwhile, the grim work of recovering bodies began.    Some brave souls were lowered over the cliff at the Gap where as many as 20 bodies had collected among the rocks.   They had been so badly battered that none were ever identified.    Other bodies were found inside Sydney Harbour where they had been swept by the current.   Most were buried in a mass grave in the Newtown Cemetery.

    Sydney Harbour. Courtesy Google Maps.

    An inquiry concluded that Captain Green, hampered by the foul weather, had either thought he was approaching the North Head or mistook the Gap for the entrance to Sydney Harbour.   As a result of this catastrophe and another similar shipwreck nine weeks later a lighthouse marking South Head was built.       

    John Johnson was later employed as a lighthouse keeper in Newcastle and in 1866 he rescued the only survivor of the steamer Cawarra when it sank trying to enter that harbour.

    © Copyright C.J. Ison / Tales from the Quarterdeck, 2022.

    To be notified of future blogs, please enter your email address below.

  • The Mystery of the Zuydorp

    Illustration of the Dutch ship Zuytdorp, 1712. Western Australian Shipwreck Museum.

    In August 1711 the Zuydorp sailed from the Netherlands bound for Batavia (Jakarta) in the Dutch East Indies (Indonesia).   However, after rounding the Cape of Good Hope, the ship vanished without a trace.    For more than 200 years the fate of the ship and all those on board her remained a mystery. 

    The Zuydorp was a large merchant ship around 30 to 50 metres long carrying 200 or more people and cargo including a large quantity of freshly minted silver coins.   Unlike other ships to come to grief on New Holland’s dangerous coast, no survivors made it to Batavia to tell what happened.

    It was not until 1927 when the head stockman at Tamala Station, Tom Pepper and his family discovered relics from the long-lost ship about 60kms north of Kalbarri on the Murchison River.   Some of the artefacts were silver coins minted in 1711 which helped identify the wreck.   By 1954 the site where the survivors had landed was examined in more detail, and a decade later divers finally found the wreck site and its trove of silver coins.

    Looking north from the mouth of the Murchison River towards the rugged coast where the Zuydorp was wrecked. Photo CJ Ison.

    At the time the Zuydorp was on her way to Batavia, ships were using the “Roaring Forties” to push them across the southern Indian Ocean before bearing north following the coast of New Holland to reach the East Indies.    It seems the captain misjudged his position and the Zuydorp struck the reef at the base of cliffs that now bear the ship’s name.

    The accident probably happened at night, the captain unaware of how close he was to land.   The archaeological evidence suggests that an unknown number of people survived the wreck and managed to get ashore.   The remains of what may have been signaling fires have been found on top of the cliffs but apart from a scattering of other artefact nothing remains to hint at what befell the survivors.    The place is devoid of fresh water for much of the year and no one could have lived long without the help of the local Nhanta people who inhabit that stretch of coast.    

    Interestingly in 1834, an Aboriginal man told settlers in Perth that there had been a ship wrecked far to the north of Perth.   From his description, it was thought to be somewhere in the vicinity of Shark Bay, a bit further north than where the Zuydorp was ultimately discovered, but they also thought the wreck he was referring to was recent.   A search party was dispatched to investigate but no wreck or survivors were found.   It is quite likely he was drawing on oral history passed down the generations which had recorded the loss of the Dutch ship.

    Courtesy Google Maps.

    © Copyright C.J. Ison / Tales from the Quarterdeck, 2022.

    To be notified of future blogs, please enter your email address below.

  • HMCS Protector 1884 – 1924

    HMCS Protector at Heron Island during low tide. Photo: C.J. Ison.

    There lie the remains of an old ship on the Southern Great Barrier Reef which holds a fascinating story spanning almost 140 years.    The rusting hull now serves as a breakwater protecting the entrance to the boating channel accessing Heron Island, but its history goes back to 1884.

    Her Majesties Colonial Ship (HMCS) Protector was launched at Newcastle on Tyne in 1884 to see service in South Australian waters.    The colonial government had sought the ship at a time when there were heightened fears of a Russian invasion.    The 55metre long F1 flat-iron gunboat displaced 920 tons and had a top speed of 14 knots (26km/h).   Originally she was crewed by about 90 men.   

    South Australian gunboat Protector circa 1885. Photo Courtesy SLV.

    Her armaments included one 8-in breech-loading gun on the bow, as well as five 6-in guns, four 3-pounder quick-firing (QF) guns and five Gatling machine guns.   From 1914 that was changed to three QF 4in MkIII guns, two QF 12-pounder guns and four QF 3-pounders.  

    HMCS Protector regularly patrolled the South Australian coast for the next fifteen years and not surprisingly made an uneventful time of it.   Then, on the eve of Federation, she was called upon to join the international force assembled to suppress the “Boxer Rebellion” in China.  

    HMCS Protector. Courtesy State Library of South Australia, B18116.

    In August 1900 she farewelled Adelaide and was commissioned as HMS Protector for the duration of her overseas service.   She arrived in Shanghai in late September but was not needed for combat operations.   She spent a few weeks carrying out surveys and running despatches between Shanghai and forces in Pechili Gulf further north.  Then, in November she was released to return home to Australia.   

    In January 1901 HMCS Protector was transferred to the Commonwealth Government and stationed in Sydney where she mainly functioned as a training ship for Naval Militia Forces.    Then, with the formation of the Royal Australian Navy in 1913, she was renamed HMAS Protector and for a period served as a tender to HMAS Cerberus stationed at Williamstown in Port Phillip Bay.

    With the outbreak of the First World War, HMAS Protector was sent to Sydney and served as a depot ship to Australia’s two submarines, AE1 and AE2.   In August 1914 she and her submarines were sent to help capture the German colonies in New Guinea.   HMAS Protector remained based at Rabaul until October when she was ordered to return to Sydney. 

    HMAS Protector after being rearmed in 1914. Photo Courtesy SLV.

    Then, in October 1915 she was dispatched to report on the wreck of the German cruiser Emden which had been destroyed by HMAS Sydney at the Cocos Islands almost a year earlier.   See my blog Australia’s first “ship on ship” naval action.

    On 1 April 1921, the Protector was briefly renamed HMAS Cerberus, before being decommissioned three years later.    Her guns and engines were removed and she was sold off.   In November 1929 she was converted to a lighter and renamed Sidney.    But her military service was not quite over yet. In July 1943 the Protector was brought back into service as a lighter for the U.S. Army in New Guinea.   However, as she was being towed north she collided with a tug off Gladstone, Queensland.  The wreck was abandoned on a beach until a local businessman bought it reputedly for £10.   He floated it off and towed it to Heron Island where it was used as a breakwater.   HMAS Protector’s rusting hull is still there today.

    HMCS Protector at Heron Island. Photo: C.J. Ison.

    © Copyright C.J. Ison / Tales from the Quarterdeck, 2022.

    To be notified of future blogs, please enter your email address below.