Tag: Ship

  • The Bogus Count and Hamlet’s Ghost

    Hamlet’s Ghost at Surabaya, Indonesia, 1868. Photo Courtesy: Walter B Woodbury Photograph Collection, Robert S. Cox Special Collections and University Archives Research Center, UMass Amherst Libraries.

       Some things you can’t make up. This is the improbable story of how a young man impersonating an Austrian aristocrat came to cruise up the Queensland coast on a resurrected vessel named Hamlet’s Ghost.

       In May 1868, a dashing young man stepped ashore in Sydney claiming to be Count Ignaz Von Attems, a blood relative of Archduke Albert of Austria. The Von Attems family traced its aristocratic lineage back to the 12th Century. To Australia’s class-conscious and pretentious squattocracy, the young count gracing their presence was a man to be feted.

       Von Attems knew how the game was played, for he was a master far beyond his 25 years might suggest. He dressed extravagantly, splashed money around with abandon, hinted at a lavish monthly stipend and generally loved to court attention. He was a man to be seen and, more importantly, to many in colonial society, a man to be seen with. No social gathering of the day would be complete without the aristocratic Count attending. He would often dress in the full uniform of an Austrian cavalry officer, complete with sword, even when wandering about town.

       But, after spending just four weeks in Sydney being wined and dined by the city’s social elite, he up and left for Brisbane, promising he would return after doing a spot of hunting in the recently separated colony to the north.


    “The Gallant Count Von Attems” newspaper article from the 1940s. Source: Trove.

       Count Ignaz’s reception in Brisbane was no less exuberant than it had been in Sydney. The Premier of Queensland, Robert Mackenzie, hosted a champagne lunch in Von Attems’s honour, attended by the colony’s leading citizens, for no other reason than he had deigned to visit their humble domain.

       As in Sydney, he borrowed heavily on lines of credit with the colonial banks and convinced local merchants and new acquaintances alike to temporarily cover his expenses. His usual excuse, and one rarely questioned, was that he was waiting for his monthly allowance to catch up with him.

       By now, Count Von Attems, or Curt Oswald Schmulz as he was better known to his family back in Austria, had perfected his – far from petty – grift. Schmulz was charismatic, urbane, and exceedingly generous with “his” money. He was everything one would expect from a well-bred Austrian gentleman. Born into a middle-class family in Saxony, the young Schmulz attended a Commercial Academy and worked in a counting house (an accounting firm) while completing his studies. He also began mixing with friends from wealthier families who enjoyed a far more lavish lifestyle than he could afford. That did not deter the young man from living life to the full. Unfortunately, by the time young Curt Schmulz celebrated his 20th birthday, he had amassed debts neither he nor his father could repay.

    The man dressed in white is likely Curt Schmulz AKA Count von Attems on board Hamlet’s Ghost at Surabaya 1868. Walter B Woodbury Photograph Collection, Robert S. Cox Special Collections and University Archives Research Center, UMass Amherst Libraries.

       He quietly boarded an American-bound ship, leaving Europe and his financial troubles behind. However, the United States was embroiled in its own problems. The Civil War was raging, and Schmulz joined the Union Army, where he apparently served with some distinction. By the time he was mustered out at the end of hostilities, he had risen to the rank of Captain.

       For the next two years or so, he travelled through South America, Africa, and the Middle East before returning to Europe. He supported himself by using forged letters of introduction and drawing on fictitious lines of credit with banks far from where he happened to be at the time. No doubt his earlier employment at the counting house stood him in good stead, for he would have known how the financial system worked and how he could exploit it in those early days. He never stayed anywhere for long and assumed the personas of many different people, real and imagined. He also became adept at assuming the airs of a European aristocrat.

       When he left Sydney, he had no intention of ever returning. To do so would have courted disaster, for it would only be a matter of time before the trail of crumbs he had left behind him caught up. When it was time for him to leave Brisbane, he intended to keep heading north and make for Batavia in the Dutch East Indies (present-day Indonesia) to start anew.   

    And, one day, he found the ideal vessel to take him there. He purchased a luxurious pleasure craft enigmatically named Hamlet’s Ghost. It had a story just as interesting as the bogus Counts. A clue to its origin, for students of Shakespeare, can be found in the yacht’s name. Hamlet’s Ghost had been born from the carcass of the whaling schooner, Prince of Denmark.

    Example of an 1860s whaling Schooner.

       The Prince of Denmark had run aground on one of the Chesterfield Islands far out in the Coral Sea during a heavy storm in 1863. The prospect that they might be rescued by a passing ship was extremely remote. So, the captain got his men to work on building a new boat from the remains of his wrecked ship. Captain Bennett and his crew of Solomon Islanders then sailed her to Moreton Bay, where he sold the vessel. He and his men then boarded the next ship bound for Sydney.

       Hamlet’s Ghost first saw service as a lighter in Moreton Bay, transferring cargo from ships to shore. Then, three years later, a well-heeled merchant named George Harris purchased the craft. He had seen her hidden potential. After the shipwrights had finished with her, Hamelt’s Ghost had been transformed from a utilitarian workboat into a fine pleasure yacht. She was now a schooner-rigged vessel of about 8-10 tons with an elliptical stern and an overhanging bow. The hull had been sheathed in cedar and copper-plated to ward off seaworms. She had been fitted with a spacious cabin amidships, featuring a large central skylight that protruded above the deck, providing full headroom and an abundance of light.    “The vessel’s cabin is splendidly fitted up,” wrote one reporter. “The panelling is of grained maple mounted with gold mouldings, and a large pier glass fills up one end of the cabin.”

    Hamlet’s Ghost at Surabaya, 1868. Photo courtesy: Walter B Woodbury Photograph Collection, Robert S. Cox Special Collections and University Archives Research Center, UMass Amherst Libraries.

       She was also armed with three brass swivel guns to ward off any threats when cruising in remote or dangerous waters. But for the most part, Harris was content to sail her down the Brisbane River and around Moreton Bay.

       When the bogus count saw Hamlet’s Ghost, he knew it was the perfect vessel for what he had in mind. Von Attems told everyone that he intended to explore the warm waters along the Queensland coast, perhaps as far as Cleveland Bay (present-day Townsville), before returning to Brisbane. Harris was too canny a businessman to relinquish his vessel without first receiving full payment, no matter how esteemed the purchaser was. So, the count purchased the yacht with borrowed money to the sum of £500.  Von Attems crewed it with a captain, chief officer, three seamen, a cook/steward and, of course, a manservant.

       Three weeks after his sensational arrival, Count Ignaz Von Attems bid Brisbane “Auf Wiedersehen,” leaving another mountain of debt in his wake. He even had the audacity to direct creditors to the Prussian Consulate for payment shortly before he set sail.

       Curt Schmulz did not leave Brisbane too soon, for a month later, a warrant for his arrest issued in Sydney had reached the stunned city. By then, the bogus count was rounding Cape York Peninsula, but it had been anything but fair sailing up the Queensland coast.

       Hamlet’s Ghost had pulled in at Maryborough, Rockhampton and Cleveland Bay, where the leaving citizens, thrilled to be in such august company, entertained the dashing and gracious young man. But, for the crew, Count Von Attems had proved to be a particularly obnoxious creature to work for. By the time Hamlet’s Ghost had reached the government outpost of Somerset near the top of Cape York, the captain had had enough of the arrogant Count. Their latest argument escalated to the point where both men brandished their pistols, threatening to shoot each other. Cooler heads stepped in before either was hurt, and order was restored. However, the captain and the steward left the yacht at Somerset. Von Attems was only able to convince the rest of the crew to stay by promising them more money. They then left Queensland behind, passed through Torres Strait and on towards the Dutch East Indies.

       Count Von Attems, AKA Curt Schmulz, finally ran out of luck at Surabaya. There, he was arrested after passing several fraudulent bank bills. While waiting his day in court, Von Attems escaped the prison hospital and almost managed to flee the East Indies before being recaptured.

       He was finally tried, found guilty and served 10 years in Batavia’s notorious Glodok Prison. Hamlet’s Ghost was never returned to Queensland. The Dutch colonial government reportedly sold her off for £100, and her final years are unknown.

    (C) Copyright Tales from the quarterdeck / C.J. Ison 2021.

    To be notified of future blog posts please enter your email address below.
  • The Brig Amity’s Amazing Career

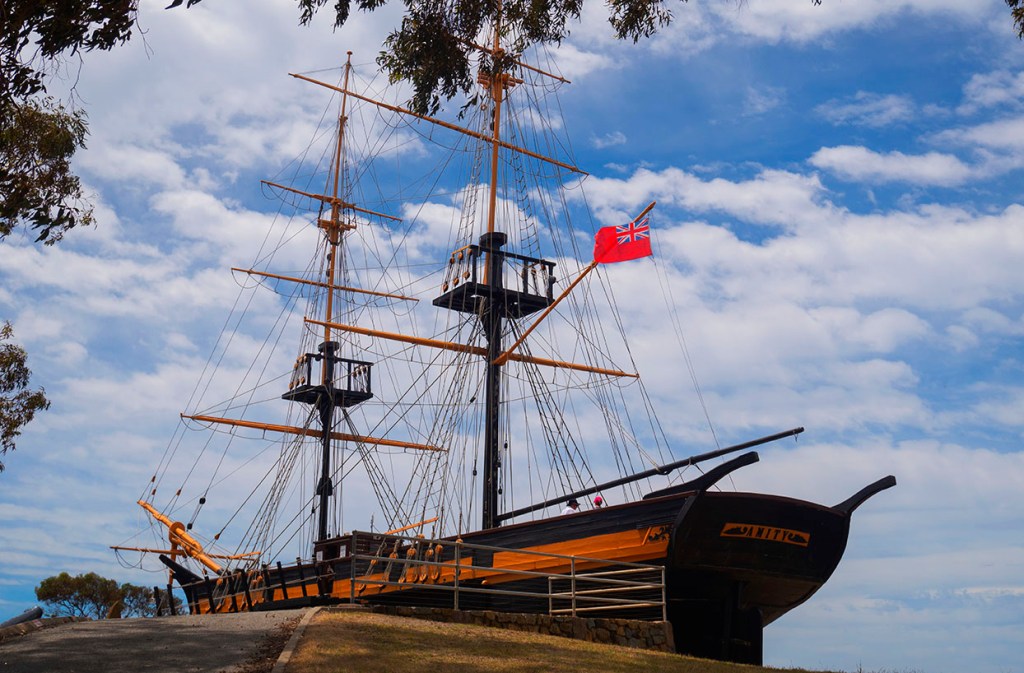
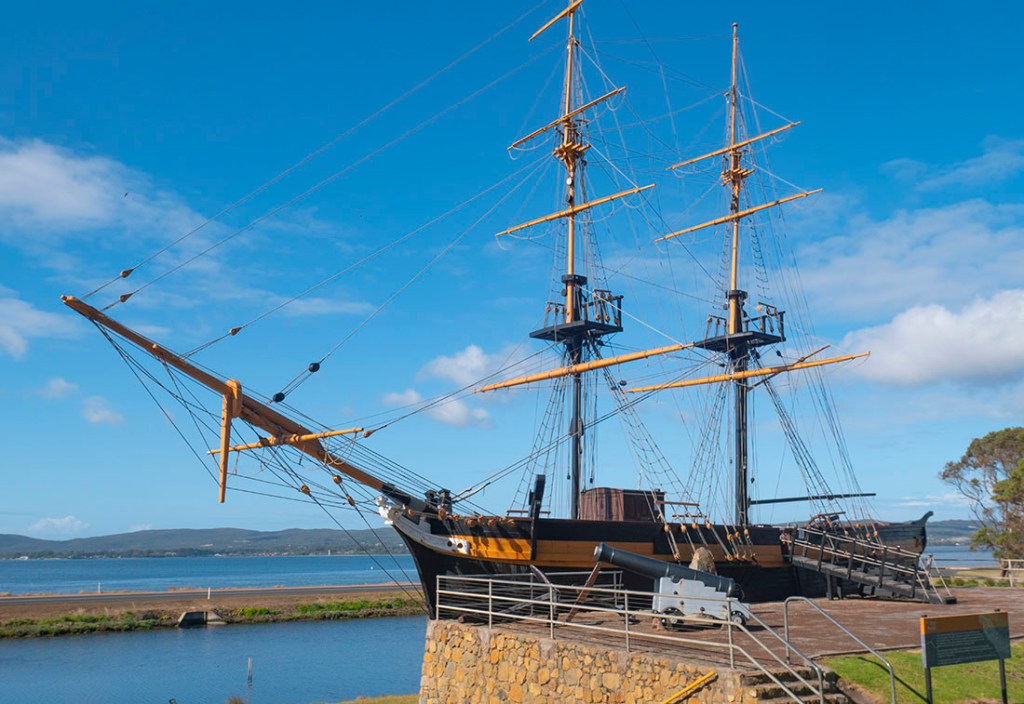
    Brig Amity replica at Albany Western Australia. Photo: C.J. Ison.

       All Australian school children learn of the Endeavour’s role in the history of Australia. Some people may have heard of the First Fleet’s flagship, Sirius, or the Investigator, which Matthew Flinders used to chart much of Australia’s coastline. But, I would wager few have ever heard of the brig Amity or know of her contribution to our colonial past.

       During the brig Amity’s six years as a colonial government vessel, she was employed to establish two new settlements in what would one day become Queensland and Western Australia. She went to the rescue of the Royal Charlotte survivors after that ship ran aground on Frederick Reef in Australia’s dangerous northern waters. She regularly transported convicts, soldiers, and supplies from Sydney to outlying settlements and circumnavigated the continent on two occasions.   

    The Amity was built in New Brunswick, Canada and launched in 1816. She was a modest-sized vessel even by the standards of the day, at 148 tons, measuring a fraction over 23 metres (75 feet) in length. But she was a sound ship and could handle rough weather.

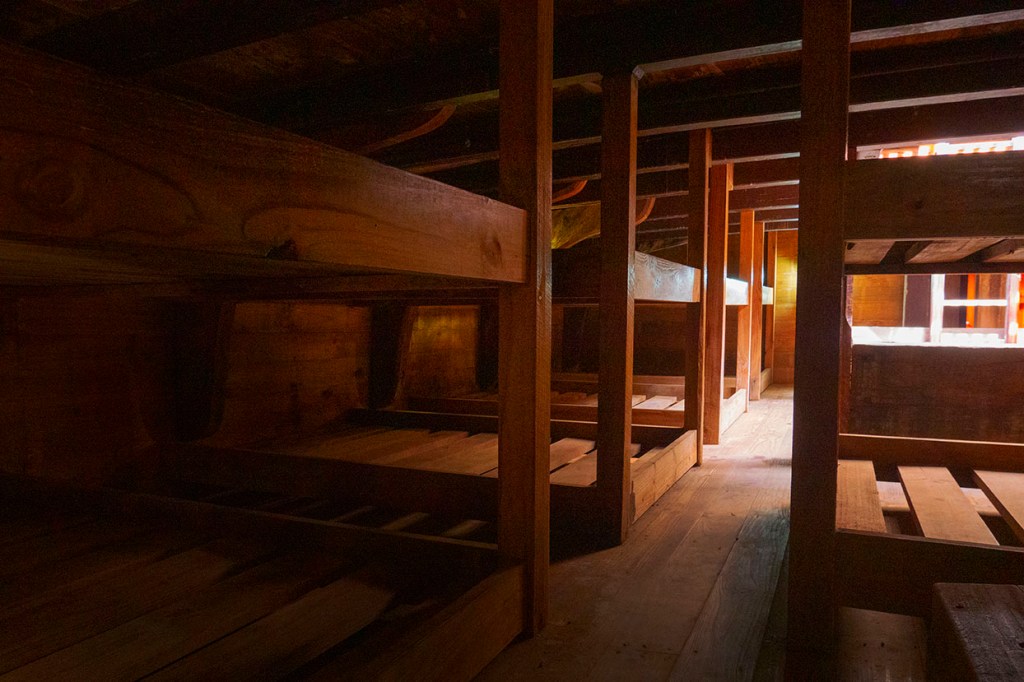
    Officer’s stateroom with tiny individual sleeping cabins leading off the main room. Photo: C.J. Ison.

       The little brig spent the first few years of her life hauling cargo back and forth across the North Atlantic between North America and Britain. In 1823, a Scotsman named Robert Ralston purchased her, having decided to emigrate to Van Diemen’s Land with his large family. He fitted the vessel out for the long voyage and filled its hold with cargo and livestock for his new adopted home.

       After a five-month voyage, the Amity sailed up the Derwent River and dropped anchor in Hobart Town on 15 April 1824. Ralston and his family purchased land and established several businesses in Hobart and Launceston, and a few months after their arrival, he put the vessel up for sale.   

    The New South Wales colonial government purchased the Amity in August 1824. The brig’s first assignment was to establish a new settlement at Moreton Bay. Two years earlier, the Bigge Report had recommended establishing a place of secondary transportation somewhere far north of Sydney for convicts who had committed additional crimes in the colony.

    The Moreton Bay Penal Settlement about 10 years after its founding. Photo Courtesy SLQ.

       On 1 September, the Amity and her crew sailed with a military officer, 20 soldiers, plus wives and children, a handful of civilian administrators, plus 30 convicts. The journey took 11 days and was marked by severe storms. Accommodation between decks measured just 1.5 metres (5 feet) high. Here, the seasick soldiers, wives, and convicts spent a miserable time packed in with the new settlement’s pigs, goats and poultry. Nonetheless, they made it at Moreton Bay and her passengers and stores were disembarked at Redcliffe, where John Oxley decided the new settlement would be established.

       Later in the month, the ship was nearly wrecked. She had been anchored out in Moreton Bay when a storm blew up. The Amity’s anchors started to drag as she was pushed towards shore. A third anchor was dropped, and the ship was held in place, averting disaster. Soon after that, she left the new settlement and returned to Sydney for more stores. On her third trip to Moreton Bay, in mid-1825, she helped relocate the settlement. Redcliffe had proved not as suitable as Oxley had thought it would be. The new location, on the north bank of the Brisbane River, was thought to be a far more suitable one.

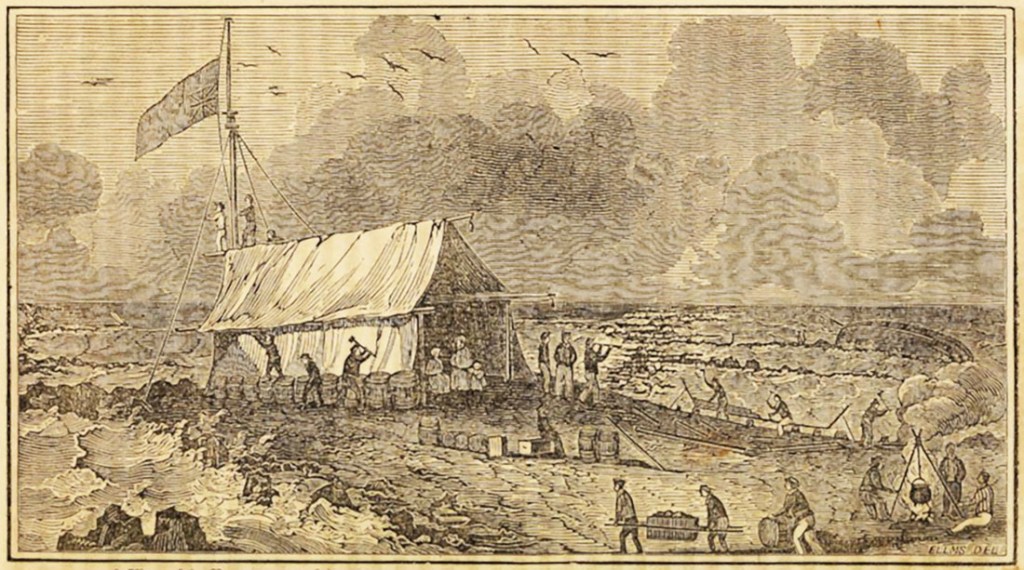
       While anchored in Moreton Bay, one of the crew spotted an unfamiliar longboat coming towards them. This turned out to be the first mate and several survivors from the ship Royal Charlotte, which had run aground a month earlier on Frederick Reef, some 720 km (almost 400 nautical miles) north in the Coral Sea.

       The first mate reported that there were still nearly one hundred souls, many of them women and children, stranded on a small sand cay which was almost awash at high tide. The Amity was immediately sent to rescue the castaways and arrived off the reef on 28 July. Getting close to the survivors proved a dangerous operation with powerful breakers crashing into the reef, threatening any vessel that got too close. The Amity eventually anchored several miles distant and its whaleboat was sent to evacuate the survivors and salvage as much as they could from the wreck. With an additional hundred people squeezed into the small brig, she sailed directly for Sydney, arriving there ten days later.

    A view of the encampment of the shipwrecked company of the Royal Charlotte on Frederick’s Reef. Illustration by Charles Ellms (circa 1848)

       For the next 18 months or so the Amity was in constant use ferrying convicts and supplies between Sydney and the outlying settlements at Norfolk Island, Moreton Bay and Port Macquarie. But, in late 1826, Governor Darling, who had recently replaced Governor Brisbane, had another important mission for the Amity and her crew.

       She was ordered to take three officers and a small detachment of soldiers, 23 convicts, plus a handful of civilian officials under the overall command of Major Edmund Lockyer to establish a new settlement. This one was to be located in the remote south-west of the continent at King George Sound (Albany).

    Convicts and other passengers were accommodated between decks which measured just five feet in height. Photo: C.J. Ison.

       Until then, Australia’s southern coast from Bass Strait to Cape Leeuwin was little known outside its indigenous peoples and the haunt of sealers who lived largely outside the law. Darling was increasingly concerned that the French, whom he had learned had recently visited the area, might try to establish a permanent presence there. 

       The small brig weighed anchor on 9 November 1826, but she soon ran into a severe storm, which saw her put into George Town on the Tamar River in Van Diemen’s Land for repairs. She finally anchored safely in King George Sound on Christmas Day, and the next morning, she began disembarking her passengers and cargo. A month later, the Amity returned to Sydney and resumed her regular resupply duties.   

    In May 1827, she accompanied HMS Supply and the brig Mary Elizabeth on a voyage via Torres Strait to Fort Dundas on Melville Island, not too far distant from present-day Darwin in the Northern Territory. Fort Dundas had been established three years earlier to facilitate trade with visiting Macassan fishermen, but it was eventually abandoned, due in part to the determined resistance put up by the indigenous Tiwi people.

    Sketch of Fort Dundas – 1824 by JS Roe. Picture courtesy State Library of Western Australia.

       Leaving Fort Dundas and the other two ships, the Amity continued circumnavigating the continent, stopping to drop off supplies at King George Sound before returning to Sydney via Bass Strait.

       In 1828-29, she paid another visit to the remote northern and western settlements when she dropped off stores before returning to her home port of Sydney, thereby completing a second circumnavigation.

       The following year, December 1830, the New South Wales government sold the brig off. She made her way back to Hobart and passed through several hands over the next decade. A couple of owners tried whaling while others employed her as a cargo ship, but they all seemed to struggle to turn a decent profit.

       In 1842, the Amity was now 26 years old and no doubt past her prime. Her new owner, a Hobart butcher named Gilbert, used her to transport livestock across Bass Strait from the mainland to Van Diemen’s Land.

       On 18 June 1845, she was driven onto a shoal off Flinders Island during one of the ferocious storms Bass Strait is rightly known for.   The ship was destroyed, but fortunately, the captain, owner and crew, numbering 11 in all, survived.    In 1976, a full-size replica of the Amity was completed in Albany to celebrate that town’s 150th anniversary. The replica provides a fascinating close-up look at an early 19th-century sailing ship and to stoop around below decks highlights just how small she really was.

    Brig Amity replica at Albany Western Australia. Photo: C.J. Ison.

    For more interesting stories from Australia’s maritime past check out A Treacherous Coast, Bolters and Tales from the Quarterdeck. All are available now as a Kindle eBook or paperback through Amazon.

    © Copyright: Tales from the Quarterdeck / C.J. Ison, 2020.

    To receive notifications of future blog posts please enter your email address below.

  • The Loss of the Mandalay: Between a Rock and a Hard Place

    Postcard of the Mandalay of Farsund Norway which was shipwrecked at Mandalay Beach near Walpole Western Australia in 1911.

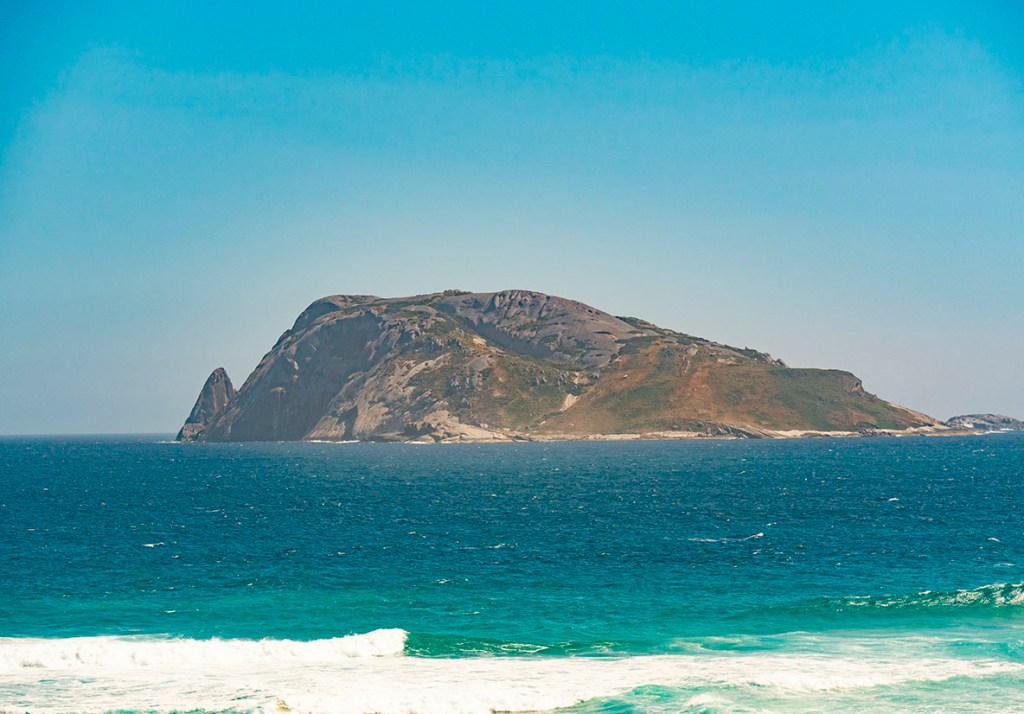
        As Captain Emile Tonnessen saw the sheer granite walls of Chatham Island loom into sight, he knew his ship and crew of 12 men were in serious trouble. He had been pushed dangerously close to Western Australia’s southern coast by unrelenting gale-force wind and high seas for the past several days. And now his 913-ton iron barque Mandalay was in imminent danger. His chart showed that, should he escape crashing into Chatham Island, there was still an uninterrupted line of cliffs beyond which he knew he could not avoid

       The Mandalay had sailed from Delagoa Bay (now Maputo), Mozambique, in early April 1911, bound for Albany WA to take on a cargo of Karri logs destined for Buenos Aires, Argentina. It was to be the 68-year-old captain’s final voyage before retiring to spend time with his children and grandchildren, whom he had seen little of during his more than half a century at sea. But for a last-minute change of plan, he would have returned to his home in Norway directly from Southern Africa.

       The voyage was largely uneventful until Saturday, 13 May, when they neared the Western Australia coast in the vicinity of Cape Leeuwin. The weather had rapidly deteriorated. South-westerly winds grew to hurricane strength, and mountainous seas washed over the vessel. All canvas was taken in, and the Mandalay was swept along under bare poles. The ferocious weather continued for two days, pushing the helpless vessel towards the rugged and sparsely populated coast.

       The crew tried everything they could to get control of the ship. But the only sail they could put up was on the fore-top mast. It was insufficient to deviate the ship from the course the storm was relentlessly pushing them. They had no chance of putting out into open water.

    Chatham Island viewed from Mandalay beach. Photo C.J. Ison.

       On Monday morning, 15 May, they cleared the kilometre-wide and 90-metre-high granite outcrop that is Chatham Island with only a few hundred metres to spare. Tonnessen later recalled that the waves were so large and powerful they crashed completely over the island as his ship raced past.

       While they had escaped being smashed against the granite slopes of the island, it was clear they would not be so lucky to get past the sheer cliffs of Long Point now lying somewhere ahead through the torrential rain. The captain took the only action he could.

       He would have to sacrifice his ship to give his crew a fighting chance of survival. In all his years seafaring, he had never been shipwrecked, but now he was going to deliberately run his vessel aground. It was no doubt made doubly hard for him, as he was a part-owner of the Mandalay, and he knew her to be underinsured.

    The Mandalay stranded on the beach.

       It was now about one o’clock in the afternoon. Tonnessen lined up to run the ship ashore on the only beach he could see, hoping for the best. The crew hoisted as much sail as they could, then donned their cork lifebelts and braced for the impact. About 100 metres from the beach, the bow struck the sand hard. The top main mast came crashing down, and the ship bounced along the seabed as successive waves lifted the ship and pushed it a little closer to shore. Then the Mandalay swung broadside to the ocean swells, and breakers crashed over the deck, sweeping it clean of anything not securely tied down.

       The crew lowered a lifeboat over the lee side, but the seas were too turbulent to safely cross the short distance to land. One of the young seamen, Knut Knutsen, tied a rope to his lifebelt and dived into the sea, intent on getting a line ashore.

       Unfortunately, the rope became entangled around his legs, and he floundered in the chaotic surf. Knutsen was close to drowning when a second sailor, Frank Ward, dived into the maelstrom to rescue him. Ward managed to get his friend to shore, and the two of them anchored their end of the rope. With one end of a line attached to the ship and the other end with Ward and Knutsen on shore, the lifeboat was able to ferry the rest of the men to safety.

    L-R Frank Ward and Knut Knutsen at Fremantle after the wreck of the Norwegian barque Mandalay. Photo published in the Western Mail, 3 June 1911, p. 27.

       The castaways were able to get sufficient materials ashore to build a shelter using some of the ship’s sails and spars. Unfortunately, they soon discovered that most of the food they salvaged had been contaminated with seawater.  They ate it regardless, figuring it was better than starving.

       They spent several miserable days camped on the beach, hoping they might be rescued. They placed a pole high on a sand dune with a distress signal flying. Several ships were seen passing in the distance, but none deviated from their course. Thonnessen knew it would have been suicide to try to get a boat ashore in the appalling conditions. But he hoped that at least one of the ships had seen the wreck and the fluttering flags and reported the disaster to the port authorities in Albany.

    The crew of the barque Mandalay. Photo courtesy Walpole Nornalup and District Historical Society.

       While Captain Tonnessen and the others remained camped on the beach, the first mate, Lars Gjoem, and two seamen set off on Tuesday, the day after the wreck, with compass and chart to see if they could find their way cross-country to the nearest settlement. Two days later, they returned to the beach cold, wet and exhausted, unable to find a path through the dense bush.

       On Friday, 19 May, the day after the party returned, the second mate, Frederick Fincki, climbed the highest hill behind the beach, and from that vantage point, he thought he could see a route through the maze of broken ground. He briefly returned to the camp to collect a staff and a knife and set off towards what he would later learn was Nornalup Inlet.

       He soon found himself wading through a swamp. But he doggedly pushed on for several hours, praying he would eventually reach dry land. Fincki made it to Nornalup inlet, arriving just as a local settler, Frank Thompson, was returning in his boat with supplies from Albany. Fincki was lucky, for that was a trip Thompson only did once every three months.

       Thompson, picked up Fincki and took him to his home, wondering to himself what would have happened had he not been passing when he did. It was bitterly cold, night was fast approaching, and the young Norwegian had been far from dry land. Thompson thought his chances of surviving would have been poor.

       The following day, Thompson, his son and the second mate returned to the beach to rescue the remaining men. Over the next several days, the shipwrecked sailors were cared for by Thompson and other settlers until they could be delivered to the small settlement of Denmark, located further down the coast. From there they were taken on to Albany, where they caught the train to Perth.

    Mandalay Beach with Long Point in the background. The wreck lies approximately in the centre of the photo. Photo C.J. Ison.

       Frank Thompson was presented with a gold fob watch by a grateful Norwegian Consul. Thompson and the other settlers who came to the crew’s aid earned the undying gratitude of Captain Tonnessen and his men. The Mandalay was never refloated and slowly rusted away on the beach that now bears her name. Its remains are periodically exposed when the conditions are right.

    ©Copyright C.J. Ison / Tales from the Quarterdeck, 2020.

    To receive notification of future blog posts, enter your email address below.

  • The Mystery Ship of Walga Rock

    The Mystery Ship of Walga Rock

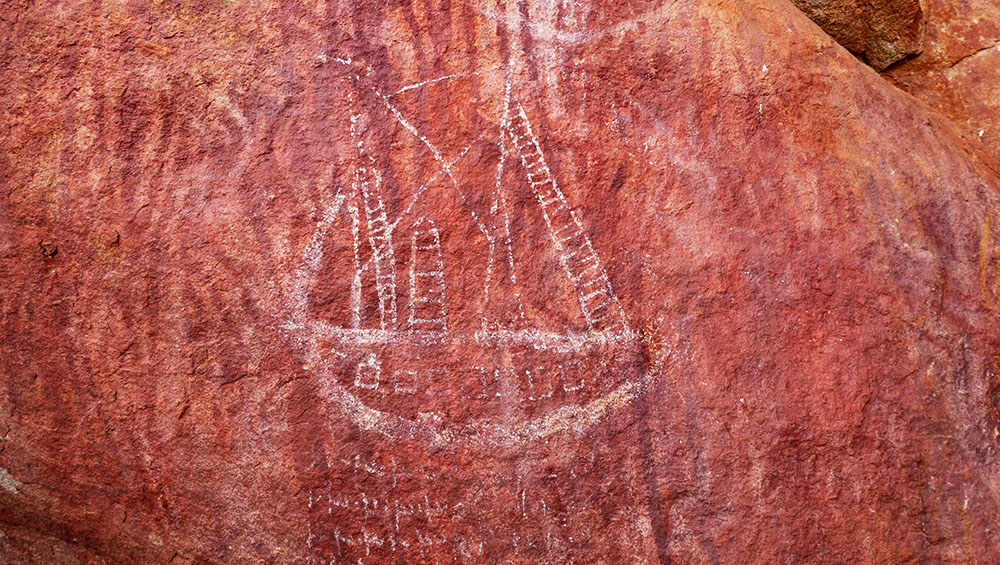
    The drawing of a sailing ship at Walga Rock, 350km from the Western Australian coast. Photo: C.J. Ison

    Tucked away at one end of an Aboriginal art gallery at Walga Rock is a clear depiction of a European sailing vessel. What makes this truly extraordinary is that Walga Rock lies more than 350 km (220 miles) inland from the nearest place where the rolling waves of the Indian Ocean crash against the Western Australian coast.

    The picture has intrigued travellers and academics for the past century, ever since its existence became known outside the Wajarri people on whose land Walga Rock is found.  

    The painting is stylistically very different to everything else in the extensive gallery.   It looks to be a depiction of a specific vessel and there is what could be Arabic verse in the same white ochre below it.    

    A section of the art gallery. Note the style and subject matter is substantially different to the ship drawing. Photo: C.J. Ison.

     Several theories have emerged as to its origin.    

    Some people believe the picture is of one of the long-lost Dutch ships which came to grief off Western Australia’s rugged coast in the 17th Century.    The VOC ships Batavia and Zuytdorp head the list.   

    The Batavia was wrecked off the Abrolhos Islands in 1629 and while the captain sailed a longboat to Batavia (Jakarta) to get help, a bloody mutiny unfolded among the remaining survivors.   When rescuers finally arrived most of the mutineers were rounded up and hanged but two were put ashore near present-day Kalbarri at the mouth of the Murchison River.    It is possible these men may have been taken in by local Aborigines and followed the Murchison River inland to the Wajarri people’s land and made the painting.

    Dutch ship Zuytdorp, 1712.

    The Zuytdorp sailed from Holland in 1711 bound for Batavia but never arrived.   The remains of a shipwreck were discovered 40km north of Kalbarri in 1927 but it was not until 1954 that it was identified as the missing Zuytdorp.   It was speculated that survivors may have been adopted by the local people and, over time, moved inland along the Murchison River.   Dutch silver coins, part of the ship’s cargo, have been found at water holes far inland, giving some strength to this theory.

    Others have speculated that in the late 19th Century, a Wajarri man may have travelled to Port Gregory or Geraldton on the coast and returned to make the illustration of a sailing ship he had seen.

    Another theory is that an Indonesian pearl fisherman named Sammy Hassan made the depiction early in the 20th Century.  It is thought that he was brought to Shark Bay to work in the pearling industry with 140 other boys on the steamer Xanthos in 1872.   Forty-five years later, aged about 60 he was reported to be living among the Wajarri people by early settlers and soon after, the picture was first noticed in the rock art cavern.   Unfortunately, there is also a report that a “Sammy” had died as a result of a shark attack back at Shark Bay.

    So, if it was not Sammy who made the picture?   It may have been one of the other boys, also named Sammy, brought out from Malaya and Indonesia to work as pearl divers.

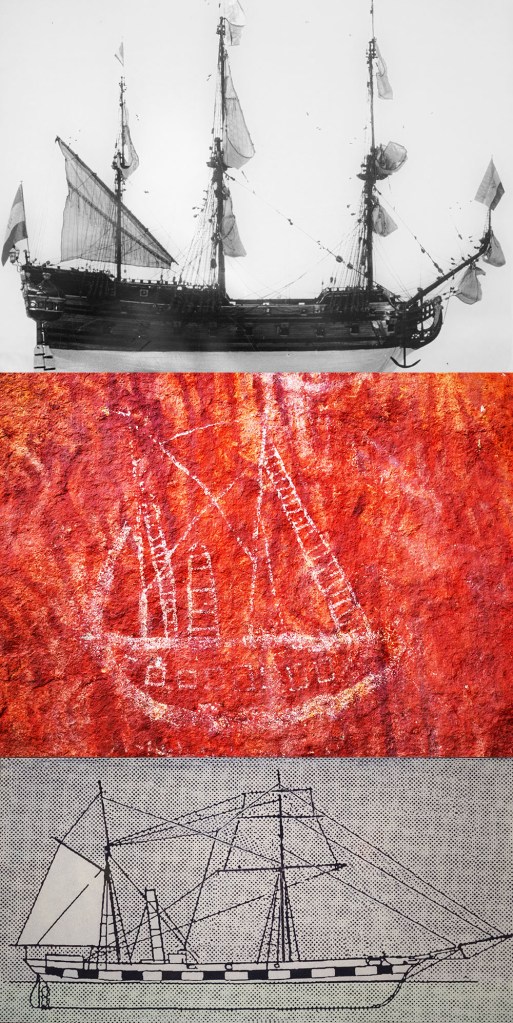
    Top: The Dutch ship Zuytdorp; Middle: the Walga Rock drawing; Bottom: The steamer Xanthos. The Walga Rock drawing bears a stronger resemblance to the bottom image.

    The strongest evidence for the last theory is the drawing itself. It bears a striking resemblance to the Xanthos, which only plied Western Australian waters in 1872 before it sank at Port Gregory. The two masts and funnel and the painted faux gun ports match the Xanthos as does the flat deck. The Dutch ships Batavia and Zuytdorp both had three masts and a high stern, making the Xanthos a stronger contender.

    The upper-Murchison River and country around Walga Rock was explored and prospected from the 1850s onward.    But I could find no mention of the painting of a European ship on the gallery wall prior to the early 20th Century which is the era fitting the Sammy / Xanthos theory.  

    Walga Rock art gallery. Photo: C.J. Ison.

    Regardless of the drawing’s origin, Walga Rock is a fascinating place to visit and the image opens a window on several aspects of Australia’s colonial and maritime past.

    I would like to thank the Wajarri elders and community for allowing the public to visit the Walga Rock art gallery.

    © Copyright C.J. Ison. / Tales from the Quarterdeck, 2020.

    To receive notification of future blog posts please enter your email address below.

  • The Bourneuf’s Tragic Last Voyage

    Cross section of emigrant ship Bourneuf. From Illustrated London News 10 July 1852.

       On 3 August 1853, the 1500-ton Bourneuf sank in Torres Strait as she was returning to England. It was ironic that her return was cut short, for her voyage out to Melbourne, Victoria, had been no less tragic. She had left Liverpool in mid-July the year before carrying some 800 impoverished emigrants keen to start new lives in Australia. But one in ten would never make it.

       Convict transportation to New South Wales had ceased two years earlier, and the recently constituted Victorian Government had introduced an assisted migration program to try to solve a chronic labour shortage. The colony had long been short of domestic servants, farm labourers, and other workers, but the recent discovery of gold had only exacerbated the problem. Meanwhile, England was still grappling with the social dislocation brought about by the Industrial Revolution. There were more people than there was jobs. On the surface, the migration program appeared to solve both intractable problems; however, transporting the migrants halfway around the world proved costly. Not surprisingly, there was an incentive to transport the largest number of people at the lowest cost to the Government.

    Emigration Depot at Birkenhead, Liverpool. A ship, possibly the Bourneuf, about to depart for Australia in 1852.

       The emigrants, many of them families with young children, were crammed into the Bourneuf’s two tiers of tiny cabins. Passengers were required to prepare their own meals in tightly packed communal kitchens. Bathing and toilet arrangements were rudimentary at best and maintaining good hygiene was impossible from the outset in the overcrowded confines of the ship. The close, fetid conditions were the ideal environment for the spread of communicable diseases. And, it was not long before people started coming down with dysentery. By mid-voyage, measles and scarlet fever were sweeping unchecked through the ship, taking a terrible toll.

       Isolating the sick proved impossible, and for much of the passage, ten or more people, mostly children, died every week. By the time the Bourneuf dropped anchor off Geelong on 20 September, disease had claimed the lives of 83 passengers. The ship was immediately placed in quarantine while 20 desperately ill passengers recovered.

       It would be nice to think that this had been an incident, but that was not the case. Four ships packed with assisted migrants made the long passage out to Victoria in 1852; the Wanota, the Marco Polo, the Ticonderoga and, of course, the Bourneuf. All were grossly overcrowded, even by the standards of the day. Disease outbreaks raged on all four ships with terrible consequences. No fewer than 279 passengers died on the four voyages. Many more passengers had to be hospitalised and quarantined on arrival. However, the lesson was eventually learned, and the Emigration Commissioners limited future migrant ships to carrying no more than 350 passengers.

    Example of immigrant accommodation on the 1874 James Craig barque at the Maritime Museum in Sydney, New South Wales, Australia. Photo C.J. Ison.

       The Bourneuf remained in Port Phillip Bay for ten months, eventually setting sail on 18 July 1853 divested of her passengers. She sailed from Melbourne bound for Bombay before continuing back to England.

       Captain Bibby made his way up Australia’s east coast, pushed along by a south-easterly trade wind. After first passing through the Tasman Sea, he continued north into the warm tropical waters of the Coral Sea. The Bourneuf remained several hundred kilometres off the coast and well outside the Great Barrier Reef. This had become known as the “outer passage” and was considered by mariners to be safer than navigating close to land inside the reef. Captain Biddy intended to cross through the Great Barrier Reef at the Raine Island entrance so he could carefully pick his way through the labyrinth of shoals that lay in Torres Strait.

       Unfortunately, it appears that Captain Biddy had miscalculated his run towards the entrance. At 1 a.m. on 3 August 1853, a lookout spotted a thin white line of breaking surf looming out of the darkness. By the time the danger had been seen, it was too late to take evasive action. The ship slammed into the Great Detached Reef about 15 kilometres south of the Raine Island entrance. Unrelenting swells from the Pacific Ocean pounded the stranded vessel. Captain Bibby gave the order to abandon ship. Thirty-nine people took to three lifeboats that night.

       Two of the boats managed to get clear of the stricken vessel, and the survivors were later rescued by the Dutch ship Everdina Elizabeth. Captain Biddy, his wife, sister-in-law, and five crew drowned when huge waves capsized their lifeboat while they were still alongside the Bourneuf.

       The Bourneuf is just one of 37 ships known to have been lost in or near the Raine Island Entrance during the 19th Century.

    © C.J. Ison/Tales from the Quarterdeck, 2020.

    To receive notifications of future blog posts please enter your email below.