Tag: navigation

  • The Life and Loss of HMSC MERMAID

    HMSC Mermaid off Cape Banks, Dec. 4, 1820, by Conrad Martens. Image Courtesy National Library of Australia.

       Between 1818 and 1820, the small survey cutter HMSC Mermaid played an important role in charting Australia’s vast coastline. So, it is perhaps ironic that her last voyage should have been cut short on an uncharted reef off the north Queensland coast.

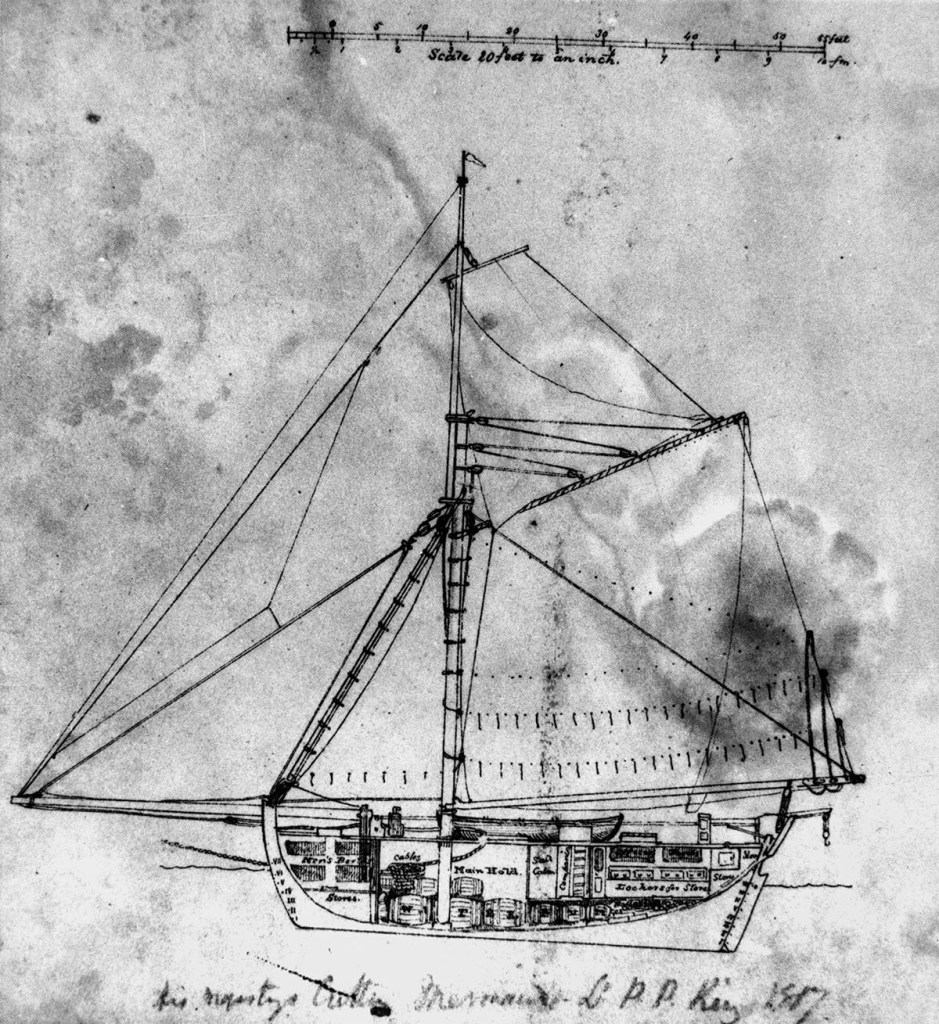
       The Mermaid was an 84-ton cutter launched in Calcutta in 1816. She arrived in New South Wales the following year and was soon purchased by the Government to undertake survey work requested by the British Admiralty.

       Lieutenant Phillip Parker King was dispatched to Australia to carry out a detailed survey of the Australian coastline, particularly those areas bypassed by Matthew Flinders. The son of former NSW Governor Phillip Gidley King, he had been born on Norfolk Island in 1791. On the family’s return to England and completion of his schooling, the young King joined the Royal Navy. He was given command of the Mermaid and got to work.

    Lt Phillip Parker King. Unknown artist. Courtesy State Library of NSW,

       HMSC Mermaid made three extensive voyages under King. They sailed from Sydney on 22 Dec 1817, bound for Australia’s northern and northwest coasts via Bass Strait and Cape Leeuwin. The crew included two sailing masters, 12 seamen and two boys. On board were also the botanist Allan Cunningham and Bungaree, a Kuring-gai man from Broken Bay who had also circumnavigated the continent with Matthew Flinders on the Investigator.

       At Northwest Cape, King surveyed and named Exmouth Gulf before continuing north along the coast until they reached Van Diemen’s Gulf and Cobourg Peninsula. From there, they sailed to Kupang on Timor Island to resupply, where they remained for two weeks. King then set sail for Sydney, returning down the West Australian coast. The return trip was marred by rough weather and a shortage of manpower. Several of the crew had become seriously ill shortly after leaving Timor, and one of them subsequently died. Despite the hardships, the Mermaid arrived back in Sydney on 29 July 1818 after an absence of seven months and seven days.

       Between December 1818 and January 1819, King sailed to Van Diemen’s Land and undertook a survey of Macquarie Harbour, which would soon become the site of one of the convict era’s most brutal places of punishment. Their work done there, the Mermaid was back in Sydney in late February, and in May she was off again.

    Lt King’s survey cutter ‘Mermaid’ Photo courtesy State Library of Queensland.

       The third voyage, and King’s last in the Mermaid, saw them sail up the east coast of Australia on a circumnavigation of the continent. On 20 July, while sheltering in a bay he named Port Bowen at latitude 22.5 S (not to be confused with the present-day township of Bowen), the Mermaid ran aground and became stuck. It was only after considerable effort that the crew were able to warp the vessel into deep water, but she sustained serious hull damage in the process. The full extent of the injury would only become apparent months later.

       The Mermaid continued north, passed through Torres Strait and King again started making a detailed survey of the north-west coast. However, the cutter had been taking on water ever since its beaching at Port Bowen. By September, she was leaking so badly that King was compelled to careen the vessel and attend to the leaking hull. With repairs completed as best they could, he then cut short his survey and ran down the west coast, across the Great Australian Bight, returning to Sydney in December. However, the Mermaid was very nearly wrecked within sight of her home port.

       As they passed Jervis Bay, the wind was blowing strongly from the east-south-east and visibility was much reduced by heavy rain. Lt King steered a course that he thought would find them off Sydney Heads the following morning. But at 2 o’clock in the morning, King, thinking they were still 30 km from land, was surprised when a bolt of lightning revealed they were sailing directly towards Botany Bay’s south head. The Mermaid only just cleared that hazard but lodged on a rock off the north head before being lifted off by a large wave. She ploughed through breakers within metres of the rocky promontory with the sea surging and foaming around them. It was a very close call, but they were soon safely inside Sydney Harbour without further incident.

       Lt King made his fourth and final survey in the Bathurst while the Mermaid underwent much-needed repairs.   But that was not the end of the little cutter’s adventures.   She was decommissioned from the Royal Navy and taken over by the NSW colonial government, where she continued to serve with distinction.

    Mermaid being repaired during King’s voyage. Engraving by John Murray 1825. Image courtesy National Library of Australia.

       In 1828, the Mermaid received a major overhaul, including re-planking, new copper sheathing, and, most importantly, being re-rigged as a two-masted schooner. Then, in early 1829, she was tasked with helping dismantle the failed settlement at Raffles Bay on the Cobourg Peninsula. Once done there, they were to make for the remote settlement of King George Sound (present-day Albany) to deliver stores and dispatches. Under the command of Captain Nolbrow, the Mermaid departed Sydney on 16 May and headed north, keeping to the inner passage inside the Great Barrier Reef.

       Tragedy struck at 6 o’clock in the morning on 13 June when, about 35 km south of present-day Cairns, the Mermaid ran grounded on a reef not recorded on King’s recently published naval chart. At 8 p.m., Captain Nolbrow and his crew, 13 men in all, took to the lifeboat with the hold bilged and water already over the cabin deck.

       Twelve days later, as they continued north towards Torres Strait, the castaways were picked up by the Admiral Gifford. The Admiral Gifford was a 34-ton schooner on a speculative voyage through Australia’s northern waters and was ill-equipped to carry so many additional passengers. On 3 July, Nolbrow and his crew were transferred to the much larger Swiftsure, possibly in the vicinity of Pipon Island. Unfortunately, the Swiftsure was wrecked two days later near Cape Sidmouth and her crew, along with the Mermaid’s, were rescued by the Brig Resource.

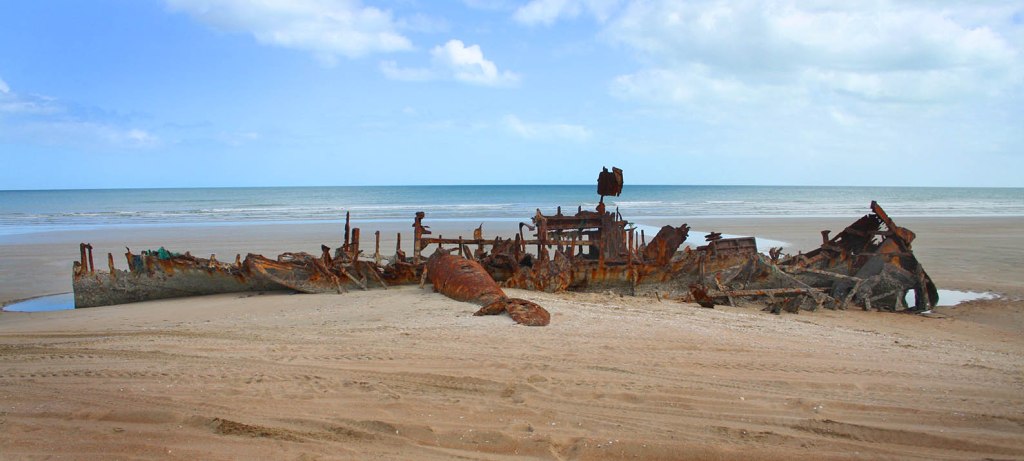
       Captain Nolbrow and his men eventually made it back to Sydney via the Swan River settlement (present-day Perth) in November 1829. The remains of the Mermaid were discovered on Flora Reef in 2009.

     © Copyright C.J. Ison / Tales from the Quarterdeck, 2023.

    To be notified of future blogs, please enter your email address below.

  • No Charts, No Worries

    A schooner of the early 1800s. Courtesy State Library of Queensland.

    When Captain George Browning sailed the small schooner Caledonia from Sydney in December 1831, he intended to follow the coast north as far as the Tropic of Capricorn.   There he was to collect salvage from a ship that had been wrecked in the Bunker Islands and return it to Sydney to be sold.   But on the way, he was to call in at the Moreton Bay Penal Settlement to collect a whaleboat the crew had used to escape the wreck.   That was where things began to go wrong for the young master mariner.

    While anchored in Moreton Bay his ship was seized by a band of convicts who sent the crew ashore and ordered Browning to take them to the tiny South Pacific Island of Rotuma some 1,500 nautical miles or 3,000 kilometres away over open ocean.   See my blog “The Caledonia’s perilous last voyage,” for a more detailed account.

    Among the many challenges he faced, he had no charts covering the South Pacific.  Yet, Browning had to find a way to deliver his unwanted passengers to their destination if he was to have any chance of saving his ship and preserving his own life.   He consulted his “Epitome of Practical Navigation,” a book all master mariners kept close at hand.   The regularly updated volume was considered the standard text on maritime navigation and was packed with charts and tables to help mariners navigate the world’s oceans.   

    Example from The American Practical Navigator, 1837. There were several such books used by master mariners.

    Browning referred to a table of South Pacific Islands with their corresponding geographic coordinates.  With this information, he flipped over one of his coastal charts and drew a grid labelling the key lines of longitudes and latitudes for the waters he would be sailing and marked the various known islands and features identified in the table, albeit with many reefs, shoals and other hazards left unrecorded.   Notwithstanding its limitations, he could now take observations and plot his whereabouts and relate that to his destination – Rotuma – and any other islands in the course of his travels.   

    Using his makeshift chart, Browning navigated from Moreton Bay to New Caledonia where they stopped to collect fresh drinking water.   From there he charted a course to Rotuma and when he was directed to leave that island at a moment’s notice and make for Wallis Island he did that too.  

    Perhaps the chart’s greatest value came as they sailed towards Wallis Island.   A couple of the convicts warned Browning that their leader intended to scuttle the Caledonia and do away with its captain once they had arrived.   He knew Wallis Island lay a short distance over the horizon and they would likely arrive late that afternoon.  

    He shaped the sails to slow the ship’s progress until nightfall.   Then, during the hours of darkness, he picked up speed again and was able to slip by Wallis thereby prolonging his life a little longer.   A couple of days later they pulled in at the Samoan island of Savai’i.   There the Caledonia was scuttled but Browning was befriended by a local chief and escaped the convicts’ clutches.  He eventually returned to Australia to tell his amazing story.

    The full story is told in A Treacherous Coast: Ten Tales of Shipwreck and Survival from Queensland Waters available through Amazon.

    © Copyright C.J. Ison / Tales from the Quarterdeck, 2022.

    To be notified of future blog posts, please enter your email address below.

  • The Loss of the Mandalay: Between a Rock and a Hard Place

    Postcard of the Mandalay of Farsund Norway which was shipwrecked at Mandalay Beach near Walpole Western Australia in 1911.

        As Captain Emile Tonnessen saw the sheer granite walls of Chatham Island loom into sight, he knew his ship and crew of 12 men were in serious trouble. He had been pushed dangerously close to Western Australia’s southern coast by unrelenting gale-force wind and high seas for the past several days. And now his 913-ton iron barque Mandalay was in imminent danger. His chart showed that, should he escape crashing into Chatham Island, there was still an uninterrupted line of cliffs beyond which he knew he could not avoid

       The Mandalay had sailed from Delagoa Bay (now Maputo), Mozambique, in early April 1911, bound for Albany WA to take on a cargo of Karri logs destined for Buenos Aires, Argentina. It was to be the 68-year-old captain’s final voyage before retiring to spend time with his children and grandchildren, whom he had seen little of during his more than half a century at sea. But for a last-minute change of plan, he would have returned to his home in Norway directly from Southern Africa.

       The voyage was largely uneventful until Saturday, 13 May, when they neared the Western Australia coast in the vicinity of Cape Leeuwin. The weather had rapidly deteriorated. South-westerly winds grew to hurricane strength, and mountainous seas washed over the vessel. All canvas was taken in, and the Mandalay was swept along under bare poles. The ferocious weather continued for two days, pushing the helpless vessel towards the rugged and sparsely populated coast.

       The crew tried everything they could to get control of the ship. But the only sail they could put up was on the fore-top mast. It was insufficient to deviate the ship from the course the storm was relentlessly pushing them. They had no chance of putting out into open water.

    Chatham Island viewed from Mandalay beach. Photo C.J. Ison.

       On Monday morning, 15 May, they cleared the kilometre-wide and 90-metre-high granite outcrop that is Chatham Island with only a few hundred metres to spare. Tonnessen later recalled that the waves were so large and powerful they crashed completely over the island as his ship raced past.

       While they had escaped being smashed against the granite slopes of the island, it was clear they would not be so lucky to get past the sheer cliffs of Long Point now lying somewhere ahead through the torrential rain. The captain took the only action he could.

       He would have to sacrifice his ship to give his crew a fighting chance of survival. In all his years seafaring, he had never been shipwrecked, but now he was going to deliberately run his vessel aground. It was no doubt made doubly hard for him, as he was a part-owner of the Mandalay, and he knew her to be underinsured.

    The Mandalay stranded on the beach.

       It was now about one o’clock in the afternoon. Tonnessen lined up to run the ship ashore on the only beach he could see, hoping for the best. The crew hoisted as much sail as they could, then donned their cork lifebelts and braced for the impact. About 100 metres from the beach, the bow struck the sand hard. The top main mast came crashing down, and the ship bounced along the seabed as successive waves lifted the ship and pushed it a little closer to shore. Then the Mandalay swung broadside to the ocean swells, and breakers crashed over the deck, sweeping it clean of anything not securely tied down.

       The crew lowered a lifeboat over the lee side, but the seas were too turbulent to safely cross the short distance to land. One of the young seamen, Knut Knutsen, tied a rope to his lifebelt and dived into the sea, intent on getting a line ashore.

       Unfortunately, the rope became entangled around his legs, and he floundered in the chaotic surf. Knutsen was close to drowning when a second sailor, Frank Ward, dived into the maelstrom to rescue him. Ward managed to get his friend to shore, and the two of them anchored their end of the rope. With one end of a line attached to the ship and the other end with Ward and Knutsen on shore, the lifeboat was able to ferry the rest of the men to safety.

    L-R Frank Ward and Knut Knutsen at Fremantle after the wreck of the Norwegian barque Mandalay. Photo published in the Western Mail, 3 June 1911, p. 27.

       The castaways were able to get sufficient materials ashore to build a shelter using some of the ship’s sails and spars. Unfortunately, they soon discovered that most of the food they salvaged had been contaminated with seawater.  They ate it regardless, figuring it was better than starving.

       They spent several miserable days camped on the beach, hoping they might be rescued. They placed a pole high on a sand dune with a distress signal flying. Several ships were seen passing in the distance, but none deviated from their course. Thonnessen knew it would have been suicide to try to get a boat ashore in the appalling conditions. But he hoped that at least one of the ships had seen the wreck and the fluttering flags and reported the disaster to the port authorities in Albany.

    The crew of the barque Mandalay. Photo courtesy Walpole Nornalup and District Historical Society.

       While Captain Tonnessen and the others remained camped on the beach, the first mate, Lars Gjoem, and two seamen set off on Tuesday, the day after the wreck, with compass and chart to see if they could find their way cross-country to the nearest settlement. Two days later, they returned to the beach cold, wet and exhausted, unable to find a path through the dense bush.

       On Friday, 19 May, the day after the party returned, the second mate, Frederick Fincki, climbed the highest hill behind the beach, and from that vantage point, he thought he could see a route through the maze of broken ground. He briefly returned to the camp to collect a staff and a knife and set off towards what he would later learn was Nornalup Inlet.

       He soon found himself wading through a swamp. But he doggedly pushed on for several hours, praying he would eventually reach dry land. Fincki made it to Nornalup inlet, arriving just as a local settler, Frank Thompson, was returning in his boat with supplies from Albany. Fincki was lucky, for that was a trip Thompson only did once every three months.

       Thompson, picked up Fincki and took him to his home, wondering to himself what would have happened had he not been passing when he did. It was bitterly cold, night was fast approaching, and the young Norwegian had been far from dry land. Thompson thought his chances of surviving would have been poor.

       The following day, Thompson, his son and the second mate returned to the beach to rescue the remaining men. Over the next several days, the shipwrecked sailors were cared for by Thompson and other settlers until they could be delivered to the small settlement of Denmark, located further down the coast. From there they were taken on to Albany, where they caught the train to Perth.

    Mandalay Beach with Long Point in the background. The wreck lies approximately in the centre of the photo. Photo C.J. Ison.

       Frank Thompson was presented with a gold fob watch by a grateful Norwegian Consul. Thompson and the other settlers who came to the crew’s aid earned the undying gratitude of Captain Tonnessen and his men. The Mandalay was never refloated and slowly rusted away on the beach that now bears her name. Its remains are periodically exposed when the conditions are right.

    ©Copyright C.J. Ison / Tales from the Quarterdeck, 2020.

    To receive notification of future blog posts, enter your email address below.

  • The Loss of Carpentaria Lightship CLS3

    The rusting remains of Carpentaria Lightship CLS3 which was washed ashore at Vrylia Point on Cape York in January 1979 during Cyclone Greta. Photo C.J. Ison.

    With an estimated 8,000 or more shipwrecks in Australian waters you could be mistaken for thinking the country’s foreshores would be littered with the remains of long-lost vessels standing silent testament to the dangerous waters they sailed.    In fact, there are surprisingly few recognisable shipwreck remains dotting Australia’s coastline.   

    One I had the opportunity to visit a few years ago was the old unmanned Carpentaria Lightship CLS3 which was driven ashore on the remote west coast of Cape York.

    Three Carpentaria Lightships moored in the Brisbane River near Peters Slip, Kangaroo Point circa 1924. Photo courtesy State Library of Queensland.

    The Carpentaria Lightship CLS3 was one of four built at the Cockatoo Island Dockyard in Sydney between 1916 and 1918.  

    They were designed by the Scottish naval architects Charles and David Stevenson, and measured 22 metres in length, 7.8 metres breadth and 2.7 metres draft and displaced 164 tonnes.     The hull was constructed of riveted steel plates.  

    An acetylene powered gas light sat atop a mast amidships and was visible 18.5 kilometres (10nm) away.   The vessels carried sufficient acetylene to keep the light burning for six months so there was no requirement for them to be manned.  

    There were also mechanisms to switch the light off during the day and for them to flash their distinctive codes when operating.   The lightships were also fitted with a bell which rang as the ship rolled to warn nearby vessels of impending danger.

    They were the first lightships to be built in Australia and most of their long careers were spent in Queensland waters.  

    Two were always on station, one in the Gulf of Carpentaria and the other at Breaksea Spit north of Fraser Island.   The other two were held in reserve undergoing maintenance and ready to be rotated with those at sea.  One of the Carpentaria Lightships, CLS4 was later used in Bass Strait before being retired in 1985.

    Carpentaria Lightship CLS4 at the National Australian Maritime Museum in Sydney, New South Wales. Photo C.J. Ison

    The Carpentaria CLS3 was moored at Carpentaria Shoal off the north west coast of Cape York when in January 1979 Cyclone Greta struck. The lightship broke free and was driven south-east towards Cape York beaching a little north of Vrilya Point about 65 kilometres south of Thursday Island. Attempts to haul the vessel off the beach failed and she has remained there rusting away ever since.

    Carpentaria Lightships CLS2 and CLS4 can now be seen at the Queensland Maritime Museum in Brisbane and the Australian National Maritime Museum in Sydney.

    © Copyright C.J. Ison/Tales from the Quarterdeck, 2020.

    To receive notifications of future blog post enter your email address below.