Tag: Great Barrier Reef

  • The Loss of the Enchantress: A first-hand account.

    A Brig leaving Port Jackson in the 1850s.. Image courtesy National Library of Australia.

        The loss of some ships plying Australian waters was only ever noted by a brief paragraph in newspaper shipping columns. Months after leaving port, they would be reported as having never arrived at their destination. The exact circumstances of their loss and what might have happened to the souls on board will never be known. But far more often, people did survive, even if the ship did not. Captains had the grim duty to report the loss of the vessel to its owners, while passengers often wrote to loved ones about their unanticipated adventure. Such records are the sources for many a shipwreck tale.

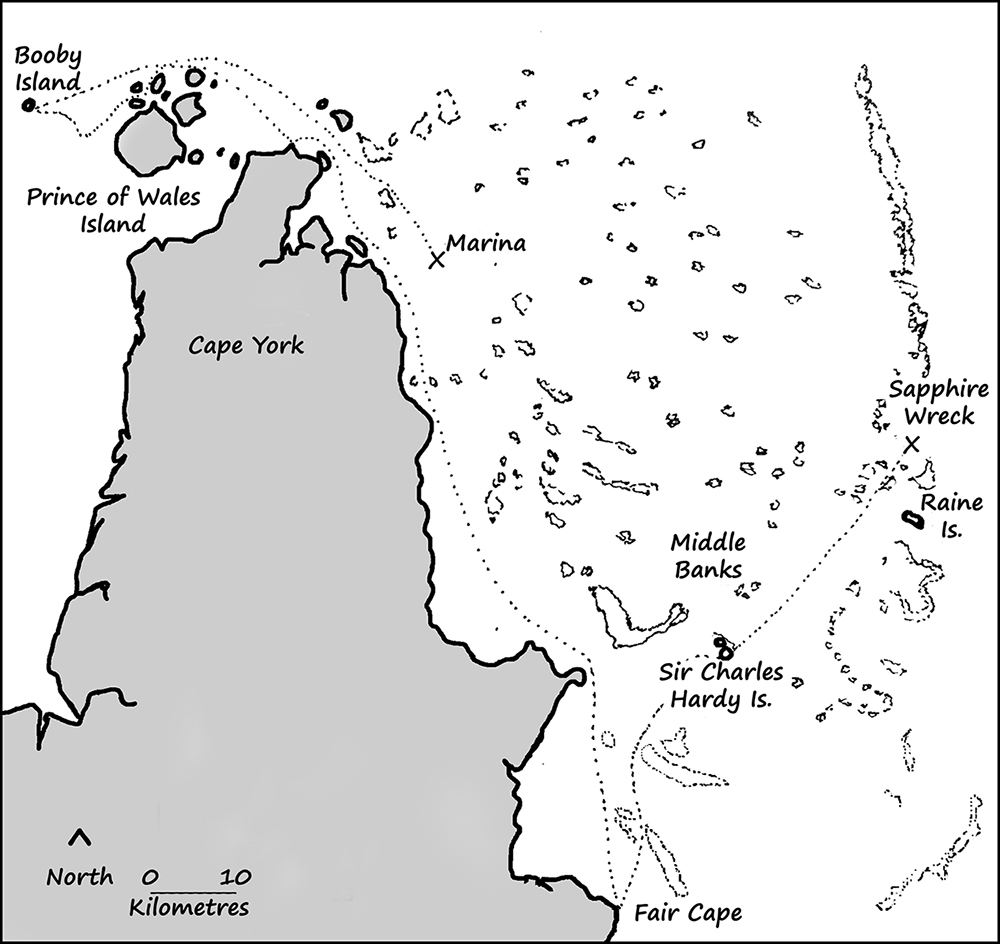
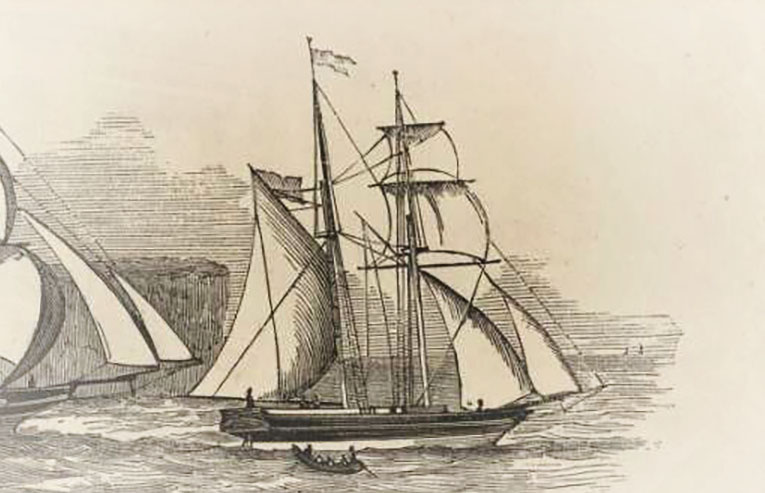
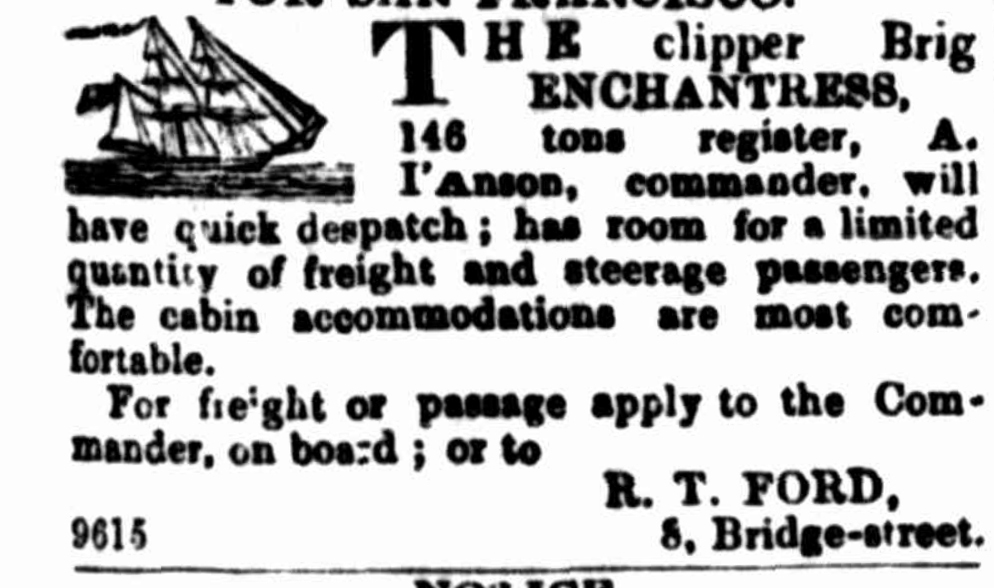
       On 24 July 1850, the 146-ton brig Enchantress was wrecked near Raine Island while trying to pass through the Great Barrier Reef. Navigating the tricky passages leading to Torres Strait could prove challenging in those early days. Between 1791 and 1887, no less than 37 ships came to grief near Raine Island. Many more were lost on reefs and shoals dotting Queensland’s northern waters.

       Mr B. Buchanan was a passenger on the Enchantress and also an employee of the company that owned the vessel. While en route to Kupang in the Dutch East Indies (present-day Indonesia), after being rescued, he penned a letter to his employers, notifying them of the loss of their ship. This letter, written 175 years ago, provides a firsthand account of the incident.

    A ship off Raine Island, Torres Strait. Illustrated Australian News for Home Readers Thu 30 Jan 1873 Page 9.

       Messrs. Smith, Campbell, and Co., Sydney.

       At Sea, approaching Kupang,

       August 3rd, 1850.

       Dear Sirs, – It is my unpleasant task to inform you of the loss of the brig Enchantress. She struck and grounded on the reef running out from Raine’s Island, on the afternoon of the 24th July.

       From the time of leaving Sydney, the weather was favourable. We joined company with the brig Lady Margaret off Newcastle. On the 24th, about noon, being a little ahead of our companion, we sighted the Barrier below the detached reef, between it and Yule’s Reef. We hauled up to the eastward, and made out the beacon on Raine’s Island between two and three pm.

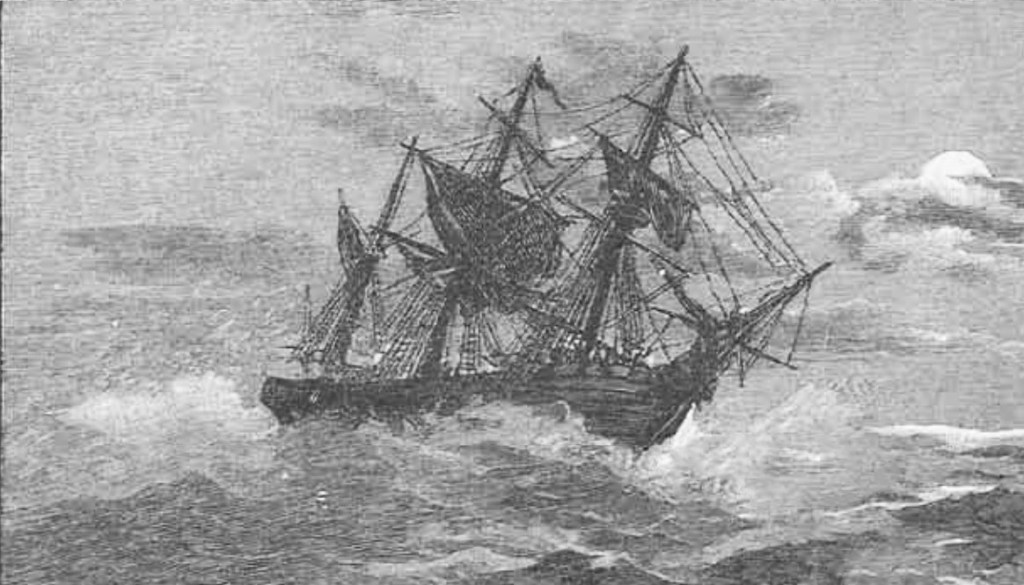
       Captain L’Anson then stood in for the southern passage, but unfortunately got too near the reef running out from the island. He tried to put her about, but she missed stays; he filled on her again, and again tried it, but a second time she missed. There was no room to wear, the wind being fresh and the current strong, and we tried a third time to stay her, but to no purpose. The strong northerly set and flood tide prevented her [from] coming round, and we were driven on the point of the reef.

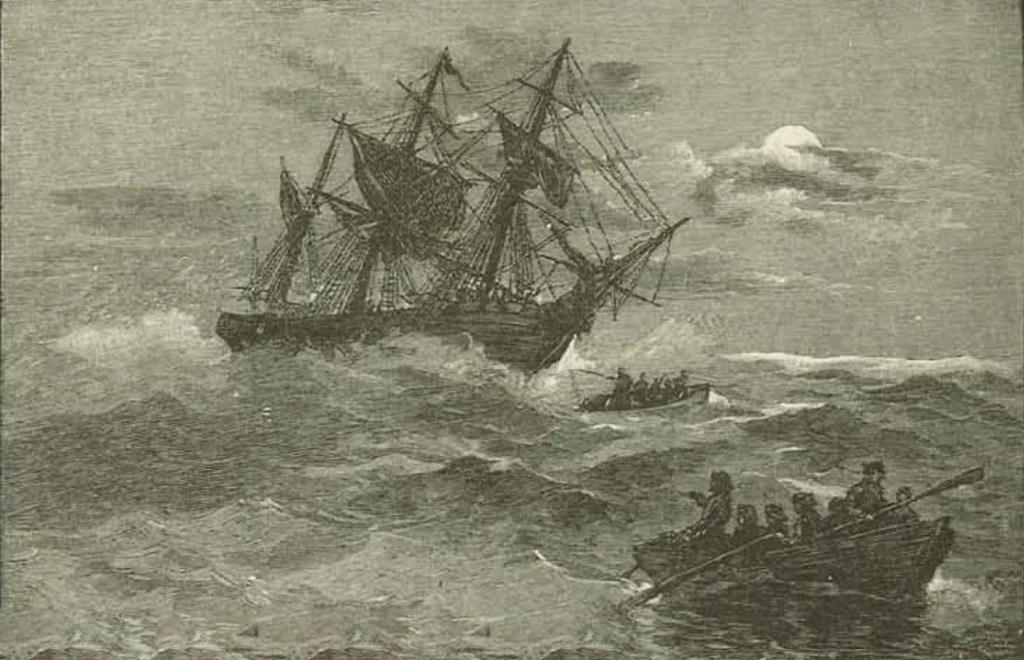
       Every sea sent us further on, the surf washing the lower masts’ heads. An attempt was made to take off the sails, but it was becoming dark, we had the reef to cross to get to the island, and the brig was thrown more over by every wave.

       We therefore got out the longboat, saving the chronometer, my papers, and some clothes. The jolly boat was washed away. We crossed the reef without difficulty and took shelter in the beacon.

    Map showing location of wreck at Raine Island. Courtesy Google Maps.

       At three a.m. of Thursday, the 25th, Captain L’Anson, it being low tide, started with the boat, manned by the majority of the crew, with the intention of saving all he could from the wreck. He got the boat alongside, but the sea was breaking so heavily that it was not possible to remain; they brought away some provisions, cooking utensils, and nearly all my things, but could save nothing pertaining to the ship. They were afraid of the boat being swamped.

       At the time of our first attempting to stay the brig, the Lady Margaret was following close, but immediately went about. Captain Grant stood off that night, bore down again in the morning, and worked on and off all day.

       We knew that it would be out of all reason to expect him to bring up after having once entered, before he got to anchorage ground, about twenty-five miles from Raine’s Island; and saw also that he was unwilling to pass without communicating with us (we learnt afterwards that he was afraid we were without provisions or water).

       Meanwhile, the weather had assumed a threatening aspect, we therefore dispatched the boat with five of the people, under Mr Wood, the chief officer, to the Lady Margaret; they succeeded in reaching her after a very long and laborious pull.

    Advertisement for passage on the Enhantress. SMH 30 May 1850, p. 1.

       I had written to Captain Grant, with suggestions for relieving us, but his position was one of such danger that he could give no attention thereto; his anxiety was to get us on board at once, and be off, and to attain this he despatched his second officer with his jolly boat to the island immediately, our own boat returning at the same time to aid in bringing what clothes we had saved.

       We left the island at four p.m., and were taken on board the Lady Margaret at dusk. She stood out to sea, and in the morning entered by the Southern Passage.

       The poor Enchantress when last seen by us was being between twenty and thirty yards from the point of the reef – bows on the water, masts standing.

    [The letter was published in the Sydney Morning Herald newspaper on 3 December 1850. Here, it is re-published as it first appeared in print, but for a few minor changes to spelling and punctuation.]

    [The letter was first published in the Sydney Morning Herald newspaper on 3 December 1850.   Here, it is reproduced as it appeared in the newspaper, but for a few minor changes to spelling and punctuation.]

    © Copyright C.J. Ison / Tales from the Quarterdeck, 2022.

    To be notified of future blogs, please enter your email address below.

  • HMCS Protector 1884 – 1924

    HMCS Protector at Heron Island during low tide. Photo: C.J. Ison.

    There lie the remains of an old ship on the Southern Great Barrier Reef which holds a fascinating story spanning almost 140 years.    The rusting hull now serves as a breakwater protecting the entrance to the boating channel accessing Heron Island, but its history goes back to 1884.

    Her Majesties Colonial Ship (HMCS) Protector was launched at Newcastle on Tyne in 1884 to see service in South Australian waters.    The colonial government had sought the ship at a time when there were heightened fears of a Russian invasion.    The 55metre long F1 flat-iron gunboat displaced 920 tons and had a top speed of 14 knots (26km/h).   Originally she was crewed by about 90 men.   

    South Australian gunboat Protector circa 1885. Photo Courtesy SLV.

    Her armaments included one 8-in breech-loading gun on the bow, as well as five 6-in guns, four 3-pounder quick-firing (QF) guns and five Gatling machine guns.   From 1914 that was changed to three QF 4in MkIII guns, two QF 12-pounder guns and four QF 3-pounders.  

    HMCS Protector regularly patrolled the South Australian coast for the next fifteen years and not surprisingly made an uneventful time of it.   Then, on the eve of Federation, she was called upon to join the international force assembled to suppress the “Boxer Rebellion” in China.  

    HMCS Protector. Courtesy State Library of South Australia, B18116.

    In August 1900 she farewelled Adelaide and was commissioned as HMS Protector for the duration of her overseas service.   She arrived in Shanghai in late September but was not needed for combat operations.   She spent a few weeks carrying out surveys and running despatches between Shanghai and forces in Pechili Gulf further north.  Then, in November she was released to return home to Australia.   

    In January 1901 HMCS Protector was transferred to the Commonwealth Government and stationed in Sydney where she mainly functioned as a training ship for Naval Militia Forces.    Then, with the formation of the Royal Australian Navy in 1913, she was renamed HMAS Protector and for a period served as a tender to HMAS Cerberus stationed at Williamstown in Port Phillip Bay.

    With the outbreak of the First World War, HMAS Protector was sent to Sydney and served as a depot ship to Australia’s two submarines, AE1 and AE2.   In August 1914 she and her submarines were sent to help capture the German colonies in New Guinea.   HMAS Protector remained based at Rabaul until October when she was ordered to return to Sydney. 

    HMAS Protector after being rearmed in 1914. Photo Courtesy SLV.

    Then, in October 1915 she was dispatched to report on the wreck of the German cruiser Emden which had been destroyed by HMAS Sydney at the Cocos Islands almost a year earlier.   See my blog Australia’s first “ship on ship” naval action.

    On 1 April 1921, the Protector was briefly renamed HMAS Cerberus, before being decommissioned three years later.    Her guns and engines were removed and she was sold off.   In November 1929 she was converted to a lighter and renamed Sidney.    But her military service was not quite over yet. In July 1943 the Protector was brought back into service as a lighter for the U.S. Army in New Guinea.   However, as she was being towed north she collided with a tug off Gladstone, Queensland.  The wreck was abandoned on a beach until a local businessman bought it reputedly for £10.   He floated it off and towed it to Heron Island where it was used as a breakwater.   HMAS Protector’s rusting hull is still there today.

    HMCS Protector at Heron Island. Photo: C.J. Ison.

    © Copyright C.J. Ison / Tales from the Quarterdeck, 2022.

    To be notified of future blogs, please enter your email address below.

  • The Countess of Minto’s brush with Disaster

    .

       In 1851, two men accomplished a sailing feat that few thought was possible. They had been the only hands on board the barque Countess of Minto when she was driven from her anchorage during a violent storm. The captain and the rest of the crew were left stranded on a remote desert island. Everyone thought the ship had foundered in the storm, but four weeks later, she sailed into Sydney Harbour. To everyone’s astonishment, the two men had survived and sailed their ship over 1000 kilometres to safety.

       On 25 August 1851, the 300-ton Countess of Minto was anchored off Lady Elliot Island on the Great Barrier Reef to collect guano, a valuable commodity at the time. John Johnson and Joseph Pass had just returned to the ship after taking the captain and the rest of the men ashore to dig for guano. Soon after the pair returned to the ship, the weather began to deteriorate.

       By midday, the wind was howling through the rigging, the seas boiled around the ship, and the deck was being lashed by torrential rain. It was now far too dangerous to take the jolly boat ashore to join their shipmates on the island. Johnson and Pass had no choice but to ride out the storm where they were.

       The two seamen let out the anchors as far as they would go, hoping they would remain firmly dug into the seabed. The ship surged and the chains strained with each powerful swell, and for a time they held.

       Then, around 11.30 that night, a very thick squall struck. The force of the wind and the seas was too great, and the anchors started dragging along the sea floor. The barque was swept out into the deep water of the Coral Sea, somehow missing the island and the nearby reefs. Johnson and Pass had no control over the ship as it bucked and tossed in the tumultuous seas. They could only pray that the vessel would not founder and they might survive the night.

       Johnson was the ship’s carpenter, and Pass was the steward. Neither was part of the regular sailing crew, but it is evident that one or perhaps both men possessed a wealth of sailing experience. And, at least one of them knew how to navigate using a sextant and a chronometer.

       The pair survived the wild night, and by the next morning, the wind had eased and the men could take stock of their situation. Lady Elliot Island was nowhere to be seen. In fact, no land at all interrupted the horizon in all 360 degrees. They checked for damage to the sailing gear and hull and were relieved to find the Countess of Minto had survived the storm with only superficial injury. The hull, masts, and sails were intact, but they were now drifting aimlessly under bare poles at the mercy of the wind and current.

       Both anchors were still dangling at the ends of 45 fathoms (90 metres) of chain. The deck was littered with ropes and other gear that had broken loose but had not been washed overboard. The longboat had been swept off the forward hatch and was now full of water and being dragged along behind the ship. The jolly boat, likewise, was trailing behind.

       They released the anchors after being unable to haul them up on their own. They set up a boom with a block and tackle and retrieved the two boats. Then they tidied up the deck. At midnight, they pumped eight inches of water out of the bilge and continued working through til dawn.

       They finally hoisted some canvas from the main mast and bore towards the south-east. For the first time since being swept from their anchorage nearly 36 hours ago, they had control of the ship.

    Sydney Morning Herald, 25 Sept 1851, p. 2.

       On Wednesday evening, 27 August, the winds picked up again after a day of blowing a gentle breeze. They now tried to set a north-westerly course so they could return to Lady Elliot Island and rescue their shipmates. But in the face of contrary winds and hampered by a lack of manpower, they struggled to get back.

       For the next eight days, the pair battled the wind and the seas, trying to make it back to Lady Elliot Island. However, despite their efforts, the ship continued to be pushed southward and away from the coast. The winds were blowing from the north, and each time they tried to beat to windward, they would be pushed further south. By Friday, 5 September, Johnson and Pass were utterly exhausted and were now further away from their shipmates than ever.   

    They finally decided to go with the wind and make for Sydney so they could get help. Now with the wind behind them ,they made good time. The Countess of Minto was off Port Macquarie four days later and only had another 300 km to go before reaching Sydney. There, they fell in with another ship, and its captain came over to see what assistance they needed. Stunned to discover there were only two men on board, he offered to crew the ship and take it the rest of the way to Sydney as long as they officially handed control to him. Johnson and Pass refused, knowing full well that the captain would then be entitled to claim salvage rights. Despite their exhaustion, they figured that they could make it the rest of the way by themselves. The captain left and later returned with a few of his men, offering their help with no strings attached. This time, Johnson and Pass accepted.

    Approximate course of the Countess of Minto.

       On 20 September, the Countess of Minto sailed into Sydney Harbour to be greeted by their captain, who had just arrived and reported his ship lost. Johnson and Pass were commended for their “meritorious conduct,” and the insurance underwriters rewarded each of them with £10.

    As fate would have it, the Countess of Minto would be lost a couple of months later after striking ground off Macquarie Island as the captain sought to finish filling his hold with guano.

    The Countess of Minto’s incredible story is told in A Treacherous Coast: Ten Tales of Shipwreck and Survival from Queensland Waters, available as an eBook or paperback through Amazon.

    © Copyright C.J. Ison, Tales from the Quarterdeck, 2022.

    Enter your email address in the form below to be notified of new posts.

  • The Endeavour’s Crappy Repair

    The Endeavour being towed off the reef into deep water by Samuel Atkins (1787-1808).

    As the Endeavour famously made its way up Australia’s east coast in 1770, there was a moment when the success of Cook’s voyage hinged on a pile of sticky animal dung, and some handfuls of wool and rope fibre. The incident occurred shortly after passing Cape Tribulation, so named by Cook because that was where his troubles began.

       All of Monday, 11 June, the Endeavour had been sailing about 15 kilometres off the coast, pushed along by an east-southeasterly breeze. At 6 in the evening, Cook ordered the sail to be shortened, and he instructed the helmsman to steer to the seaward of two small islands lying directly in their path. He also had a seaman in the bow constantly sounding the depth, for he was literally sailing into the unknown. Then, shortly after 9 o’clock, as he and his officers sat down to supper, the seabed suddenly rose to within 15 metres of the sea’s surface. Cook called the crew to their stations and was prepared to drop anchor or adjust sail, but as suddenly as the seabed had risen, it dropped away again. They had just passed over a coral reef.

       Then, an hour or so later, the Endeavour ran up on a coral reef and stuck fast. Cook was about to discover he had stumbled into a dangerous labyrinth of reefs and shoals where the Great Barrier Reef pinched in close to the Australian mainland.

    “The Endeavour on the Reef” Source: Picturesque atlas of Australasia, 1886.

    An anchor was taken out aft in the hope that they might be able to kedge the Endeavour back off the reef on the high tide. But when the time came for the men to heave, she would not budge. The next high tide would be at 11 a.m., so he ordered the crew to lighten the ship for the next attempt. Cannons, ballast, water casks, stores of all sorts were tossed over the side.  At high tide, they tried kedging off the reef a second time, but again she would not budge.  Yet more stores went over the side, and on the third attempt, the Endeavour floated free, but the hull had been breached, and water was pouring into the hold.

       All three working bilge pumps were manned non-stop to stop the Endeavour from sinking. Everyone, sailors, officers, civilian scientists, and even Cook himself, took fifteen-minute turns at the pumps. Cook knew their survival hinged on finding a suitable place to beach the stricken vessel so they could make repairs. But there was no guarantee he would find such a place before his ship foundered.

       Then, a young midshipman, Jonathan Monkhouse, suggested fothering as a means of plugging the leak and buying them some much-needed time. He had seen it done with great effect on a ship he had previously served on. With nothing to lose, Cook set him to work, aided by as many men as he could spare from pumping and sailing duties.

       Monkhouse took a spare canvas sail and spread it out on the deck. He gathered up a large quantity of rope fibre and wool and had his men chop it up finely. The short fibres were mixed with dung from the animal pens and formed fist-sized sticky balls of odorous matting. These were slopped onto the sail about six to eight centimetres apart until a sizeable portion of the canvas had been covered.

       The sail was then lowered over the side of the ship forward of the hole in the hull, and then drawn back along the side. As the fother – the particles of oakum and wool – were sucked in through the rents in the hull, they caught on the edges, and in no time at all, they plugged the holes and slowed the leaks to a trickle.

    Map showing Endeavour Reef when the ship went aground. Source: Google Maps.

       “In about half an hour, to our great surprise, the ship was pumped dry, and upon letting the pumps stand, she was found to make very little water, so much beyond our most sanguine expectations had this singular expedient succeeded,” Joseph Banks would later write in his journal.

       For the first time since striking the reef, the Endeavour was out of immediate danger.  She was now taking on less than half a metre of water each hour, and that could be easily managed using just a single bilge pump.

       The Endeavour sailed a bit further up the coast until they reached what is now named Endeavour River. There, Cook found a steeply sloping sandy beach ideally suited to careening his ship. And, after several days’ delay waiting for safe conditions to enter the river mouth, he ran the barque onto the beach to examine the damage.

    The Endeavour beached for repairs. Photo courtesy SLQ

    At 2 a.m. [on 23 June] the tide left her, which gave us an opportunity to examine the leak, … the rocks had made their way [through] 4 planks, quite to, and even into the timbers, and wounded 3 more. The manner these planks were damaged – or cut out, as I may say – is hardly credible; scarce a splinter was to be seen, but the whole was cut away as if it had been done by the hands of man with a blunt-edged tool,” Lieutenant James Cook later wrote.

       Cook also found a fist-sized lump of coral lodged in the hull, along with pieces of matted wool and oakum, which so successfully stemmed the leak.

       At low tide the next day, the ship’s carpenters began replacing the damaged planks and the armourers got the forge going to manufacture replacement bolts and nails to secure the new timbers in place. In all, Cook and his crew spent six weeks there making repairs and re-provisioning.

    HMB Endeavour. Photo Courtesy SLV.

       Once the hull was repaired, the Endeavour put back out to sea on 4 August and gingerly made her way north. But they were still trapped in the same dangerous stretch of water that had come so close to ending the voyage. It would take several days of careful and nerve-wracking sailing before they escaped the intricate maze of coral shoals.

    The full story of the Endeavour’s stranding on the Great Barrier Reef is told in A Treacherous Coast: Ten Tales of Shipwreck and Survival from Queensland Waters.

    © Copyright C.J. Ison, Tales from the Quarterdeck, 2022.

    Enter your email address below to be notified of new posts.

  • The Sapphire and Marina: Three Months in a Leaky Boat

       At midday on 8 September 1859, the 749-ton merchant shipSapphire weighed anchor and began slowly making her way out of Port Curtis (present-day Gladstone, Queensland). She was ultimately bound for India via Torres Strait, with a consignment of 60 Australian horses purchased by the British Indian Army. But before the ship could clear the natural harbour, she ran aground on a sandbar and had to wait for the rising tide to lift her off.  So began a voyage that would cost 18 men their lives and last five gruelling months, only for the few survivors to wind up back where they had started. Their story is a remarkable one of perseverance in the face of unimaginable hardship, served with a healthy measure of good luck.   

    The Sapphire bore out into the Coral Sea and then headed north outside the Great Barrier Reef. On 23 September, Captain Bowden calculated he was somewhere off Raine Island. That afternoon, the lookout sighted a line of breaking surf heralding the outer edge of the reef. Bowden had the ship put about, and they tacked back and forth through the late afternoon. Captain Bowden intended to hold his position in deep water overnight and make his way through the reef first thing in the morning.

    Illustration of Booby Island, Torres Strait – Otherwise, Post Office. From the Illustrated Sydney News, Fri 16 Dec 1864, Page 9.

        But shortly after sunset, the alarm was raised. A lookout sighted a long, uninterrupted curve of white water directly in their path. By the time the ship responded to the call to pull hard about, the breakers were just 500 metres off the leeward bow. There was now insufficient sea room to turn the ship around and point her back out to sea.  The Sapphire struck the coral reef broadside. Huge waves swept her deck. The force of the collision brought down the fore-top-gallant mast, and one of their lifeboats was swept from its davits. The ship heeled over, and all seemed lost. Captain Bowden ordered the main mast cut away, hoping the vessel might right itself. When the mast came down, it landed on the deck, smashing the longboat to pieces. It also brought down the mizzen mast, which in turn crashed onto the lifeboat, damaging it. Within minutes, three of the Sapphire’s five boats were lost. Everyone spent a harrowing night sheltering as best they could while the terrified horses remained trapped in the hold.

       Breaking with maritime convention, by leaving his ship, Captain Bowden set off in the morning to search for somewhere to land. First Mate William Beveridge was left in charge of the stranded vessel. Beveridge began preparations to abandon the ship and also had the carpenters try to repair the two badly damaged boats, only half expecting that Bowden might return. It seems that Beveridge and Bowden did not see eye to eye, and the first mate may even have blamed his captain for running aground. However, Bowden did return to the Sapphire, having found a suitable refuge on Sir Charles Hardy Island about 85 km away.

       The Sapphire’s crew of 28 men took to the two surviving boats and headed to the island, abandoning the ship and the 60 horses still trapped below. Captain Bowden decided they should return to Port Curtis, 1,500 kilometres to the south, and they left messages in a bottle hung from a tree telling of their intentions. They set off south on October 6 but immediately encountered strong headwinds. Bowden soon gave up on heading south, turning his boat around to head north, through Torres Strait, intending to make for Booby Island. In another unusual turn of events, Beveridge did not follow suit. He continued trying to push south for another day or two before he also gave up and turned around.

    Sapphire survivors route through Torres Strait from leaving the Sapphire and finding the Marina.

       Beveridge reached Booby Island in mid-October to find Bowden and the rest of the men already there. By now, they had been roaming the seas around Torres Strait for almost a month. The provisions they found there were a godsend for the hungry sailors, but they would not last indefinitely. Bowden and Beveridge agreed that they would have to leave there sooner or later. It was approaching cyclone season, and they had not seen another vessel since becoming marooned. They would likely not see another ship pass by Booby Island until April or even May the next year.

       Bowden and Beveridge put their differences aside and decided to make another attempt to return to Port Curtis, despite their recent failure. But as soon as they got clear of the island, they were struck by the same contrary winds that had plagued them earlier.

       While Beveridge and his boat were off Friday Island, they were set upon by Torres Strait Islanders and one of the men was speared to death. Meanwhile, Captain Bowden’s boat was off Hammond Island. They had stopped to trade with a party of Islanders, but in what seemed like an unprovoked attack, a volley of spears and arrows was launched into their overcrowded boat. Only one man was able to jump clear and swim away. He would later be rescued by Beveridge, who had gone in search of Bowden’s boat.

       Beveridge and his men continued pushing back east and eventually made it around the tip of Cape York. They then picked their way through the maze of coral reefs, and their luck finally changed for the better.

       They spotted a ship in the distance, the first they had seen since abandoning their own vessel some six weeks earlier. But, as they drew closer, they found it was deserted. The ship proved to be the barque Marina, which had run aground around the same time the Sapphire had been wrecked. It too had been abandoned by its crew, and they had also made it to Sir Charles Hardy, reaching it only hours after the Sapphire castaways had left. Miraculously, the Marina had floated off the reef on a spring tide only to drift around Torres Strait for the next several weeks.

    Marina’s course down the Queensland Coast. Source Google Maps.

       The Marina’s crew had then set off south for Port Curtis, and after 43 days of arduous sailing, they made it safely to port and notified the authorities of the loss of their own ship and also of the Sapphire. HMS Cordelia was dispatched north to search for the Sapphire’s missing men. However, she only steamed as far as Cape Upstart, thinking the lost sailors could not still be any further north. But they were wrong. By now, it was late January 1860, and the Sapphire’s crew was anchored off Lizard Island in the Marina, 500 km further north.

       Back in late November, Beveridge had decided they should sail the Marina to Port Curtis rather than try to do so in their small pinnace. Setting off on the 26th, they battled the same contrary winds and currents that had previously frustrated them. For the next two months, they made painfully slow progress. They anchored for days and weeks at a time, waiting for the south-easterlies to fall off. In the first month, they travelled just 180 km.

       They spent tiring Christmas Day kedging the stranded barque off a sandbar, and they would run aground twice more in the weeks that followed. The Marina’s hull was so damaged that water flowed freely in and out of the hold. The only thing keeping the ship afloat was her cargo of tightly packed Kauri logs.

       On 9 February, they were anchored off Palm Island.   In the past two and a half months, they had covered a little more than half the distance to Port Curtis. They still had another 800 km or more to go.   All seemed lost.   Their food had all but run out, and they were slowly starving to death.    

    Finally, their luck turned around. The wind started blowing from the north. They put to sea and made steady progress south. Three days later, Beveridge sighted Cape Upstart off the port bow. The next day, they were cruising through the Whitsundays. They were now only 400 km from Port Curtis. A couple of days after that, they crossed Keppel Bay, and the next day, 17 February, they anchored off Facing Island just outside Port Curtis. No one had the strength to manoeuvre the crippled vessel into port. They took to the Sapphire’s pinnace again and surprised everyone with their return, for they had long been given up for dead.

    The Sapphire’s full story is told in A Treacherous Coast: Ten Tales of Shipwreck and Survival from Queensland Waters, available as an eBook or paperback through Amazon.

    © Copyright C.J. Ison, Tales from the Quarterdeck, 2021.

    Enter your email address in the form below to be notified of new posts.