Tag: Australian National Maritime Museum

  • The Krait’s Remarkable Career

    MV Krait anchored at Darwin. Courtesy AWM.

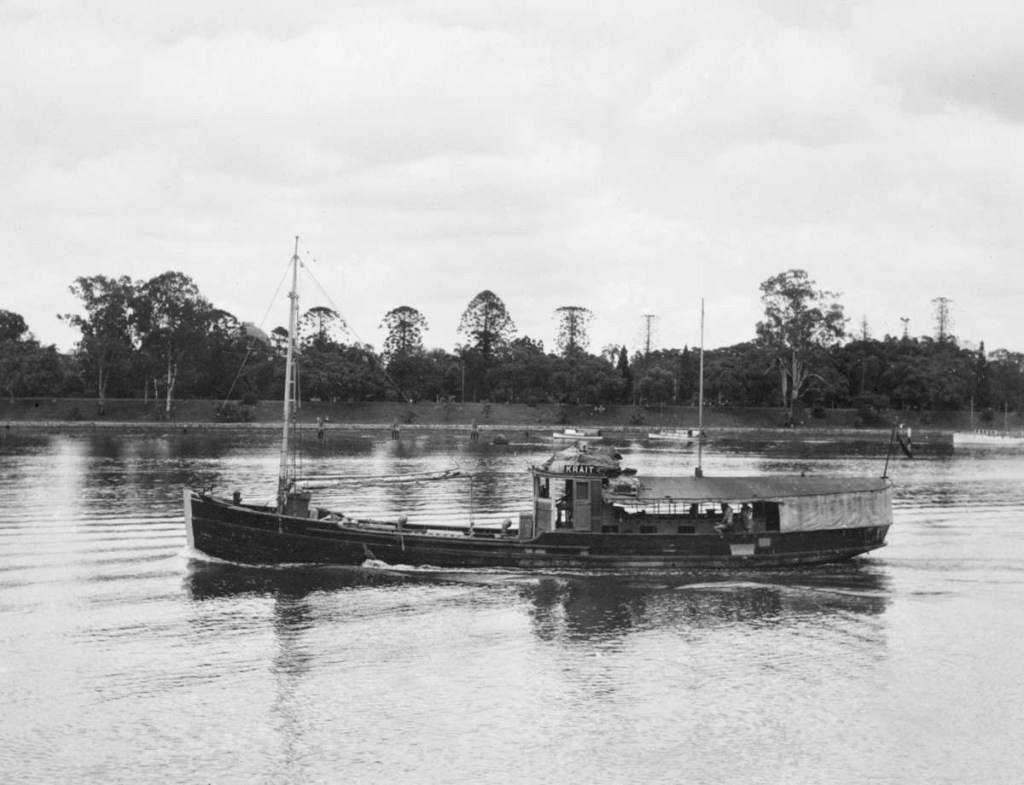
       The small fishing vessel MV Krait holds a special place in Australian maritime and military history. Named after a small, deadly snake, it played an important part in Operation Jaywick, which saw commandoes sink several Japanese ships anchored in Singapore Harbour in September 1943.

       The MV Krait started life as a Japanese fishing vessel named the Kofuku Maru, which was launched in 1934. She was a motorised gaff-rigged ketch measuring 20 metres in length, with a two-metre draft and a displacement of 23 tonnes. At the outbreak of the Second World War, the Kofuku Maru was owned by a Japanese fishing company based in Singapore. They used the vessel to ferry water, food, and other supplies to fishermen working in the Riau Archipelago and to bring their catch back to the city’s seafood markets.   

    When Japan entered the war, the British authorities seized the Kofuku Maru. As Japanese troops advanced down the Malay Peninsula, an Australian merchant mariner, Bill Reynolds, used the fishing boat to evacuate over 1000 civilians to Sumatra in the Dutch East Indies (present-day Indonesia).

    Singapore shortly before the Japanese landed on the island. Photo Central Queensland Herald, 26 Mar 1942, p. 20.

        Then, in January 1942, when it was clear that Singapore was about to fall, Reynolds sailed the Kofuku Maru to Colombo in Ceylon (present-day Sri Lanka). There, some officers from the Allied Intelligence Bureau saw the potential of having a Japanese fishing vessel at their disposal. With any luck, they thought, the Kofuku Maru might be able to traverse enemy waters without raising suspicion. Reynolds had likely told them that Japanese aircraft had ignored the vessel while he had been operating around Singapore. The Kofuku Maru was then sent to Australia, where she was made ready to begin her clandestine career.

       The Krait, though still going by its Japanese name, Kofuku Maru, was chosen to take part in Operation Jaywick, an audacious mission to destroy enemy shipping moored in Singapore Harbour. It was a high-risk, high-reward mission, but with any luck, the Japanese would not suspect the Krait of being anything other than one of the numerous small Japanese fishing vessels plying the waters around Malaya and Indonesia.   

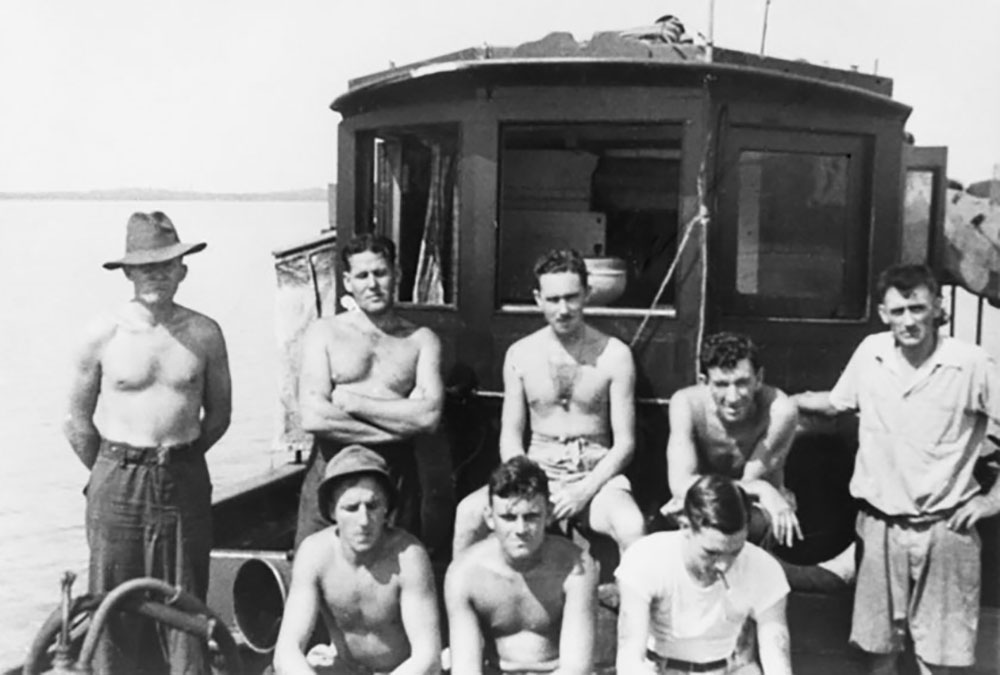
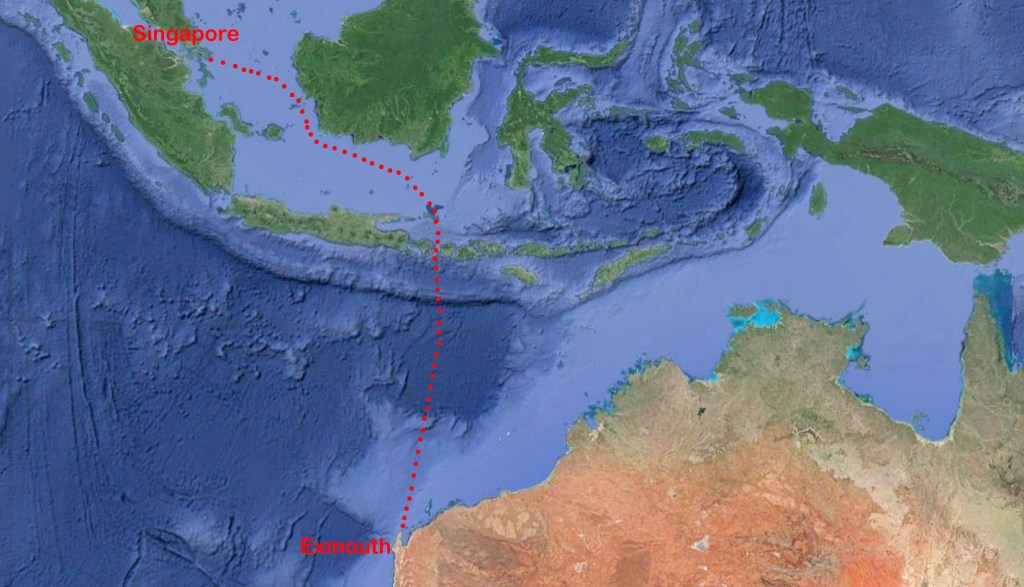
    A 14-man team was selected for the operation under the command of Major Ivan Lyons, a British Army officer attached to the Z Special Unit, better known simply as Z Force. The men chosen were a mix of British and Australian Army and Navy personnel. After completing specialised training and rehearsals at Refuge Bay north of Sydney, the Krait then made the long voyage up the east coast, through Torres Strait, past Darwin and down the Western Australia coast to Exmouth Gulf.

    A group on board MV Krait enroute to Singapore during Operation Jaywick. Courtesy AWM.

       The 7500 km long passage was not without problems. The engine quit while they were off Fraser Island, and the Krait had to be towed to Townsville, where she remained until a replacement could be found and installed. More repairs had to be made before they finally reached Exmouth Gulf, further delaying the operation.

       But on 2 September 1943, the Krait left Exmouth Gulf with the Z Special Unit men on board. The plan called for the eight-man naval contingent to sail the vessel to within striking distance of Singapore Harbour. Then six Army commandos would take to three folding kayaks, paddle into the harbour, and sink as much Japanese shipping as they could by attaching magnetic “limpet” mines to their hulls below the waterline.

       Four days after leaving Exmouth, the Krait motored through the narrow Lombok Strait with a Japanese ensign flying from her mast. Once clear of the strait, they bore west through the Java Sea towards their intended target. The men had stained their skin so they resembled local fishermen and were meticulous about what rubbish they threw overboard.   

    Towards the end of September, the Krait had made it to the small island of Pulau Panjang, just 30 km away from Singapore Harbour. The six commandos then set off in their two-man kayaks and island-hopped north to a small island where they could observe the entrance to the harbour. Meanwhile, the Krait made for safer waters near Borneo but not before agreeing on a rendezvous point with the commandos for the night of 2 October.

    MV Krait’s route from Exmouth Gulf to Singapore. Courtesy Google Maps.

       On 26 September, the six men paddled into the harbour and planted their mines on seven Japanese ships. Singapore’s early morning quiet was shattered by a series of loud explosions as the mines went off. One failed to detonate, but six ships were sunk or badly damaged. But by then, the commandos were long gone and were holed up on a small island to await the return of the Krait.

       The Japanese did not realise that the attack had come from the sea, thinking instead that it was the work of local saboteurs. Several local Chinese and Malays, along with some prisoners of war and European civilian internees, were suspected of the bombings. They were rounded up by the Japanese Military Police and interrogated. Most were tortured, and some were executed in the aftermath, an unfortunate and unforeseen consequence of the raid.

       Meanwhile, the commandos rendezvoused with the Krait as planned without incident. The Krait then set off for home. Two and a half weeks later, they were safely back in Exmouth Gulf. Major Lyons would lead a second similar raid on Singapore Harbour the following year, but Operation Rimau would end in disaster.

    MV Krait in Brisbane 1943. Courtesy AWM.

       Following the success of Operation Jaywick, the Krait was based in Darwin and used to support coast watchers and other intelligence operations, which reported on Japanese activities to Australia’s north. Commissioned into the Royal Australian Navy (RAN) in 1944, she was officially renamed HMAS Krait and, in September 1945, was present for the local Japanese surrender at Ambon.

       After the war, the Krait was employed by the British administration in Borneo until it was sold to a British-owned timber sawmill and renamed Pedang, meaning sword in Malay. In the late 1950s, a pair of Australian businessmen recognised the vessel’s historical significance and began fundraising to purchase her and have her returned to Australia.

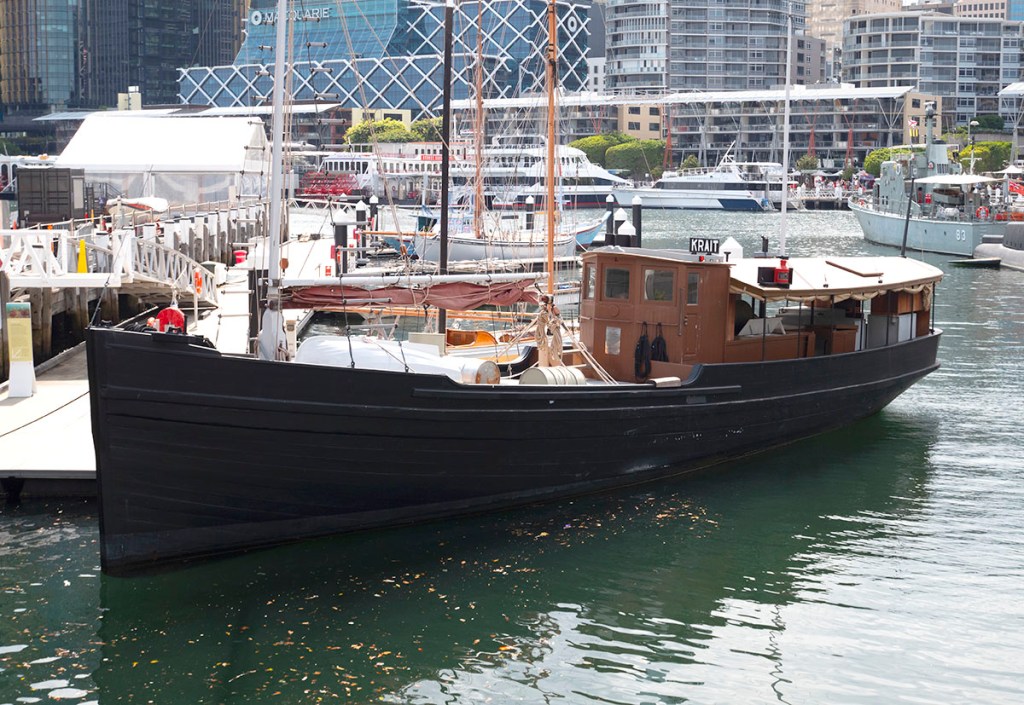
       In 1964, the Krait came back to Australia, where it was operated and maintained by the Royal Volunteer Coastal Patrol. Then, in 1984, the Krait was handed over to the Australian War Memorial and berthed at the Sydney Maritime Museum. It is now on display at the Australian National Maritime Museum in Sydney.

    MV Krait at the Australian National Maritime Museum, Sydney. Photo CJ Ison.

    Sources: 

    Australian National Maritime Museum: Articles on the Krait and Operation Jaywick.

    Royal Australian Navy: Article on the Krait and Operation Jaywick.

    Australian War Memorial: Article on Operation Jaywick.

    © Copyright C.J. Ison / Tales from the Quarterdeck, 2023.

    To be notified of future blogs, please enter your email address below.

  • The Bourneuf’s Tragic Last Voyage

    Cross section of emigrant ship Bourneuf. From Illustrated London News 10 July 1852.

       On 3 August 1853, the 1500-ton Bourneuf sank in Torres Strait as she was returning to England. It was ironic that her return was cut short, for her voyage out to Melbourne, Victoria, had been no less tragic. She had left Liverpool in mid-July the year before carrying some 800 impoverished emigrants keen to start new lives in Australia. But one in ten would never make it.

       Convict transportation to New South Wales had ceased two years earlier, and the recently constituted Victorian Government had introduced an assisted migration program to try to solve a chronic labour shortage. The colony had long been short of domestic servants, farm labourers, and other workers, but the recent discovery of gold had only exacerbated the problem. Meanwhile, England was still grappling with the social dislocation brought about by the Industrial Revolution. There were more people than there was jobs. On the surface, the migration program appeared to solve both intractable problems; however, transporting the migrants halfway around the world proved costly. Not surprisingly, there was an incentive to transport the largest number of people at the lowest cost to the Government.

    Emigration Depot at Birkenhead, Liverpool. A ship, possibly the Bourneuf, about to depart for Australia in 1852.

       The emigrants, many of them families with young children, were crammed into the Bourneuf’s two tiers of tiny cabins. Passengers were required to prepare their own meals in tightly packed communal kitchens. Bathing and toilet arrangements were rudimentary at best and maintaining good hygiene was impossible from the outset in the overcrowded confines of the ship. The close, fetid conditions were the ideal environment for the spread of communicable diseases. And, it was not long before people started coming down with dysentery. By mid-voyage, measles and scarlet fever were sweeping unchecked through the ship, taking a terrible toll.

       Isolating the sick proved impossible, and for much of the passage, ten or more people, mostly children, died every week. By the time the Bourneuf dropped anchor off Geelong on 20 September, disease had claimed the lives of 83 passengers. The ship was immediately placed in quarantine while 20 desperately ill passengers recovered.

       It would be nice to think that this had been an incident, but that was not the case. Four ships packed with assisted migrants made the long passage out to Victoria in 1852; the Wanota, the Marco Polo, the Ticonderoga and, of course, the Bourneuf. All were grossly overcrowded, even by the standards of the day. Disease outbreaks raged on all four ships with terrible consequences. No fewer than 279 passengers died on the four voyages. Many more passengers had to be hospitalised and quarantined on arrival. However, the lesson was eventually learned, and the Emigration Commissioners limited future migrant ships to carrying no more than 350 passengers.

    Example of immigrant accommodation on the 1874 James Craig barque at the Maritime Museum in Sydney, New South Wales, Australia. Photo C.J. Ison.

       The Bourneuf remained in Port Phillip Bay for ten months, eventually setting sail on 18 July 1853 divested of her passengers. She sailed from Melbourne bound for Bombay before continuing back to England.

       Captain Bibby made his way up Australia’s east coast, pushed along by a south-easterly trade wind. After first passing through the Tasman Sea, he continued north into the warm tropical waters of the Coral Sea. The Bourneuf remained several hundred kilometres off the coast and well outside the Great Barrier Reef. This had become known as the “outer passage” and was considered by mariners to be safer than navigating close to land inside the reef. Captain Biddy intended to cross through the Great Barrier Reef at the Raine Island entrance so he could carefully pick his way through the labyrinth of shoals that lay in Torres Strait.

       Unfortunately, it appears that Captain Biddy had miscalculated his run towards the entrance. At 1 a.m. on 3 August 1853, a lookout spotted a thin white line of breaking surf looming out of the darkness. By the time the danger had been seen, it was too late to take evasive action. The ship slammed into the Great Detached Reef about 15 kilometres south of the Raine Island entrance. Unrelenting swells from the Pacific Ocean pounded the stranded vessel. Captain Bibby gave the order to abandon ship. Thirty-nine people took to three lifeboats that night.

       Two of the boats managed to get clear of the stricken vessel, and the survivors were later rescued by the Dutch ship Everdina Elizabeth. Captain Biddy, his wife, sister-in-law, and five crew drowned when huge waves capsized their lifeboat while they were still alongside the Bourneuf.

       The Bourneuf is just one of 37 ships known to have been lost in or near the Raine Island Entrance during the 19th Century.

    © C.J. Ison/Tales from the Quarterdeck, 2020.

    To receive notifications of future blog posts please enter your email below.

  • The Loss of Carpentaria Lightship CLS3

    The rusting remains of Carpentaria Lightship CLS3 which was washed ashore at Vrylia Point on Cape York in January 1979 during Cyclone Greta. Photo C.J. Ison.

    With an estimated 8,000 or more shipwrecks in Australian waters you could be mistaken for thinking the country’s foreshores would be littered with the remains of long-lost vessels standing silent testament to the dangerous waters they sailed.    In fact, there are surprisingly few recognisable shipwreck remains dotting Australia’s coastline.   

    One I had the opportunity to visit a few years ago was the old unmanned Carpentaria Lightship CLS3 which was driven ashore on the remote west coast of Cape York.

    Three Carpentaria Lightships moored in the Brisbane River near Peters Slip, Kangaroo Point circa 1924. Photo courtesy State Library of Queensland.

    The Carpentaria Lightship CLS3 was one of four built at the Cockatoo Island Dockyard in Sydney between 1916 and 1918.  

    They were designed by the Scottish naval architects Charles and David Stevenson, and measured 22 metres in length, 7.8 metres breadth and 2.7 metres draft and displaced 164 tonnes.     The hull was constructed of riveted steel plates.  

    An acetylene powered gas light sat atop a mast amidships and was visible 18.5 kilometres (10nm) away.   The vessels carried sufficient acetylene to keep the light burning for six months so there was no requirement for them to be manned.  

    There were also mechanisms to switch the light off during the day and for them to flash their distinctive codes when operating.   The lightships were also fitted with a bell which rang as the ship rolled to warn nearby vessels of impending danger.

    They were the first lightships to be built in Australia and most of their long careers were spent in Queensland waters.  

    Two were always on station, one in the Gulf of Carpentaria and the other at Breaksea Spit north of Fraser Island.   The other two were held in reserve undergoing maintenance and ready to be rotated with those at sea.  One of the Carpentaria Lightships, CLS4 was later used in Bass Strait before being retired in 1985.

    Carpentaria Lightship CLS4 at the National Australian Maritime Museum in Sydney, New South Wales. Photo C.J. Ison

    The Carpentaria CLS3 was moored at Carpentaria Shoal off the north west coast of Cape York when in January 1979 Cyclone Greta struck. The lightship broke free and was driven south-east towards Cape York beaching a little north of Vrilya Point about 65 kilometres south of Thursday Island. Attempts to haul the vessel off the beach failed and she has remained there rusting away ever since.

    Carpentaria Lightships CLS2 and CLS4 can now be seen at the Queensland Maritime Museum in Brisbane and the Australian National Maritime Museum in Sydney.

    © Copyright C.J. Ison/Tales from the Quarterdeck, 2020.

    To receive notifications of future blog post enter your email address below.